The 3 Steps to Moving Your Business Online and Starting a Delivery Service Today
8 min read
Ordering goods and having them delivered to your home is second nature to most consumers. It’s one of the biggest changes to shopping habits that the digital age has brought about – whether it’s purchasing groceries, pet supplies, or meal kits. But, how do you take that first step towards moving your business online without the know how, or without previous experience with ecommerce?
How do you let your existing customers know that you’re open for deliveries? Where do you get your drivers and delivery vehicles? How do you keep track of all your deliveries and make sure your drivers get to where they are going, and on time?
Click on the links below to skip ahead:
- Go From On-Premise to Online in 3 Steps
- Using OptimoRoute to Plan Your Deliveries: A How-To Guide
- The Key OptimoRoute Features for Running a Smooth Delivery Service
Go From On-Premise to Online in 3 Steps
Here are three easy steps that business owners can take today to successfully transition their business from on-premise to online.
Step 1: Let customers know you’re open for delivery
Build an online presence
Start with social media platforms: make a Facebook business page and/or Instagram business page. This gives potential customers an easy way to find you online and through search engines, and will help drive traffic to your website. Social media is also a way that customers can share info about your business and spread the word around town. Be sure to publish your menu or price list and post it on all your social media pages, and include delivery information in everything you post as well.
Setup an ecommerce platform
After you’ve established your social media pages, it’s time to build a landing page with an ecommerce platform: Wix, Squarespace, Shopify, or another major online store vendor. Create an online ordering form that’s simple, understandable, and gives the consumer a clear idea of everything they’re getting. Google forms is a great place to get started with designing a menu.
Talk directly to customers
Then, you have to open up direct communication channels with customers: ways that they can reach out for customer support and ask questions. You can open up direct messages over social media as a start, and also ensure you have a dedicated phone number and email. Responsiveness is key: none of this is helpful if customers can’t get a quick response!
Finally, don’t forget to put up a delivery sign in your store window! That’s one of the best ways that people get information about local businesses.
Once orders start streaming in, your only job is to make sure they’re delivered in a timely and accurate manner (with a high-quality product, of course).
Timely and accurate delivery to your customer is key in the delivery business. With the right delivery planning and ecommerce route optimization software, every business can meet customer expectations.
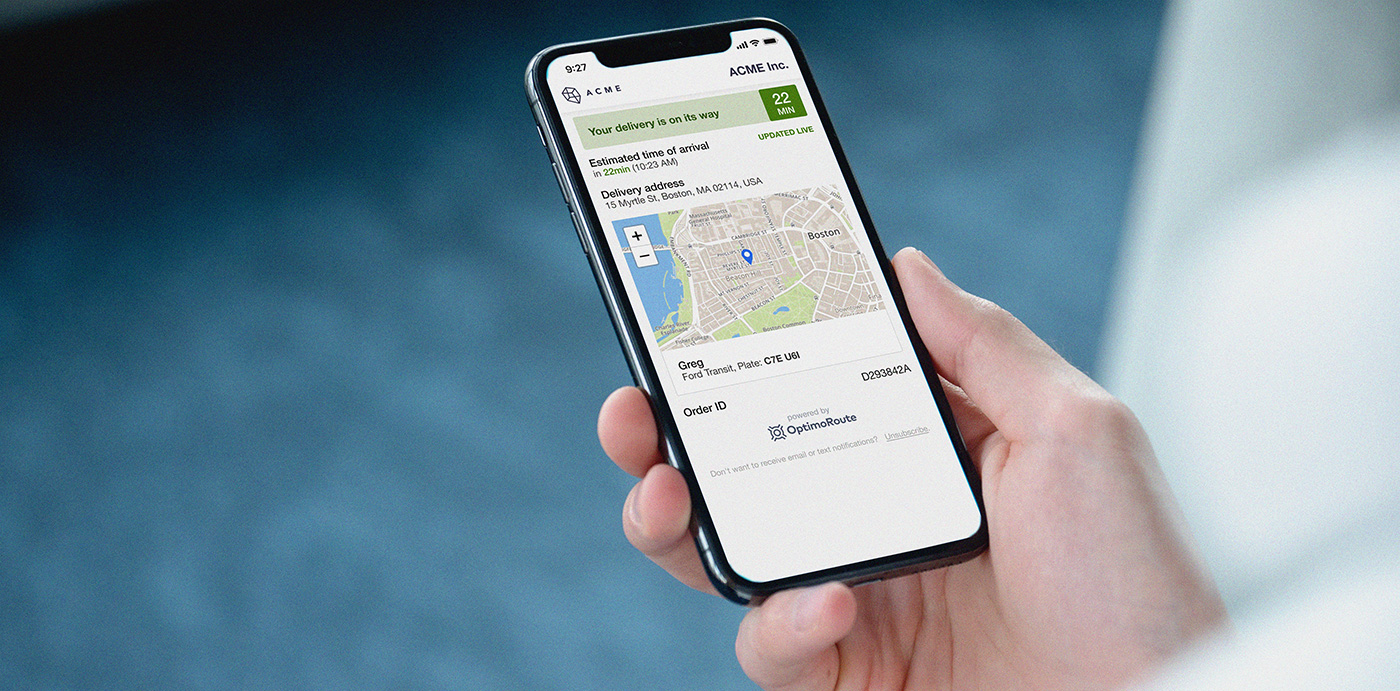
For instance, Realtime Order Tracking with Live ETAs is a standout feature that will make customers choose your business. Increase loyalty and satisfaction by allowing customers to track their orders and see exact delivery times. Realtime Order Tracking will also reduce the number of ‘is my delivery on its way?’ inquiries you receive.

Step 2: Set up a delivery workflow
The logistics of setting up and operating a delivery business can be hugely challenging: you’ll need simple, repeatable processes in place, along with some tricks prepared to deal with demand. Here are some important considerations:
Determine your optimal delivery strategy
You’ll have to choose which delivery strategy is best suited for your business. If you’re doing same-day deliveries, then you’ll need to establish a cutoff time to ensure timely deliveries. Or, you can do next-day delivery, which allows you to pack more orders per route, meaning fewer drivers, less driving, and bigger margins.
Scheduling several days in advance vastly improves the number of orders a single driver can serve. This is doubly true if you use powerful route optimization software like OptimoRoute.
Bag items ahead of time
Many delivery services pre-bag the most popular items to speed up the delivery process, or offer ready-made “essential groceries.” Make sure you include disposable cutlery in all delivery bags.
Organize delivery personnel
If possible, use existing staff as delivery personnel (this is what many small businesses do). Otherwise, you’ll have to hire a team of drivers.
Keep customer data organized in a list
Your customer’s data is one of your most valuable assets, so ensure that you keep it organized and protected. Phone numbers, emails, and delivery addresses should be easily accessible (you can use this information later for email marketing), and you’ll want to store data on previous orders and favorite meals as well (this data can tell you which products your customers prefer and inform digital marketing campaigns).
Arrange deliveries based on vehicle size
Use bikes or motorcycles for small packages, and cars and trucks for big orders or rush deliveries. Also, make sure to establish a maximum service distance from your store or restaurant. Check out our blog on how to add delivery to restaurants as well.
Once everything is ready to be delivered, learn how to manage delivery routes and keep efficiency high.
Step 3: Taking payment from customers
There are many payment methods available, and you’ll want to give customers as many ways to pay as possible. You can use a Point of Sales (POS) system like Square, Shopify, and or Shopkeep, which is easiest for most delivery & online businesses, or online payment platforms like Amazon Pay, Checkout, 2Checkout or PayPal.
You may also take credit card and even cash: if you’re taking credit card, make sure to ask for information over the phone, and if you’re using cash, make sure your drivers have enough change.
Using OptimoRoute to Plan Your Deliveries: A How-To Guide
Now we’ll show you how to use OptimoRoute to:
- Organize drivers
- Collect customer contact details and send them Realtime Order Tracking notifications
- Plan and schedule routes
- And, share routes with drivers via their mobile phones
1. Adding drivers
HELP TOPICS: For a detailed guide, go to Drivers and Vehicles; to watch a video tutorial, go to How to Create and Edit Drivers
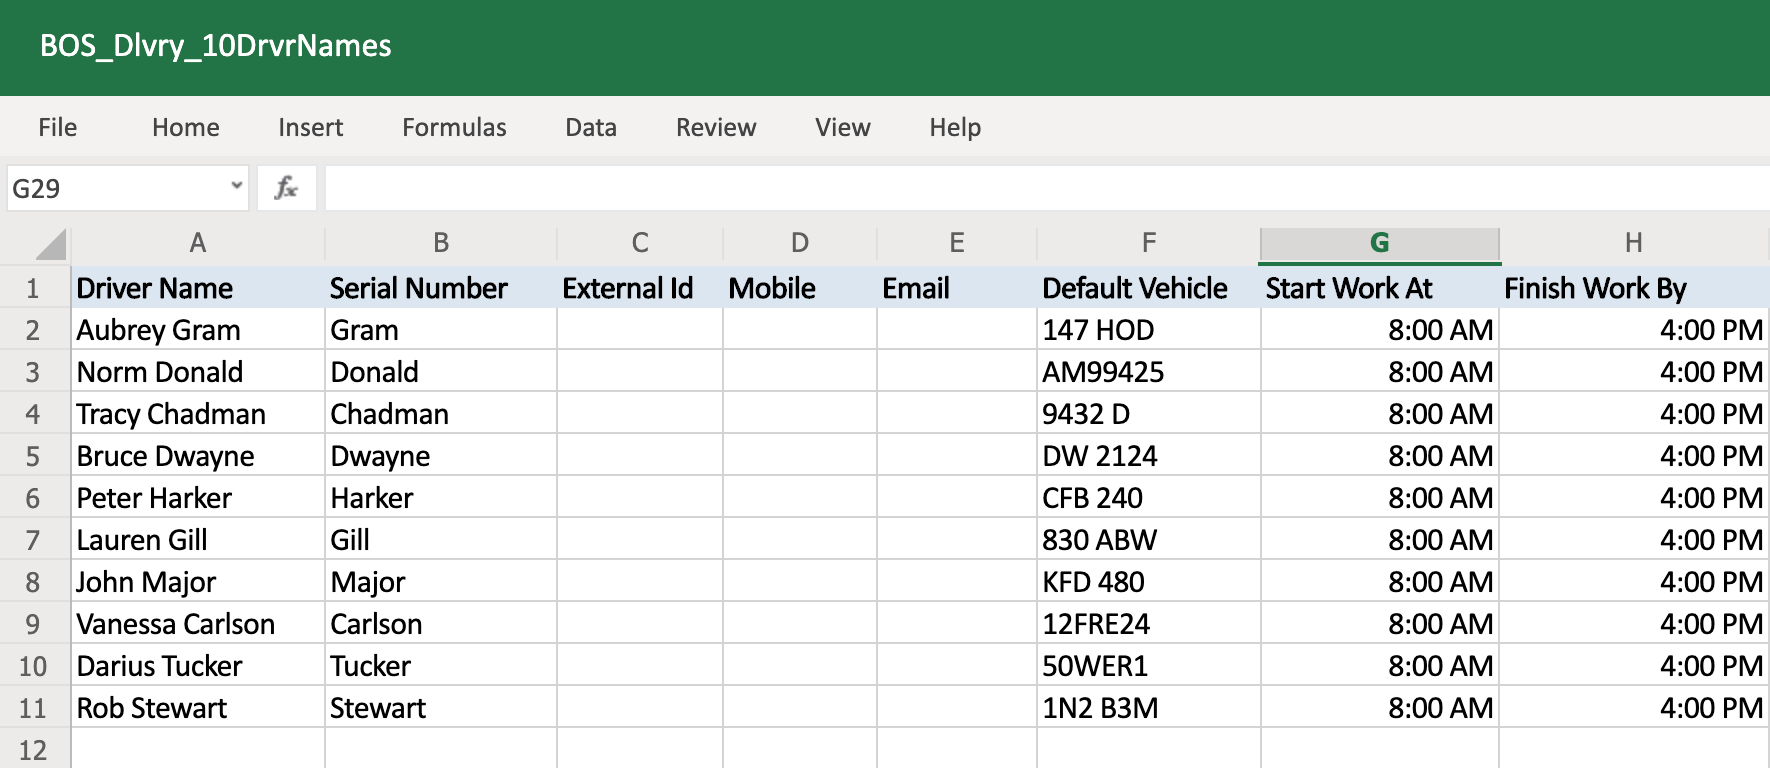
- Create an Excel spreadsheet with the names of your drivers. You can use the template provided here.
- Go to Administration – Drivers – Import drivers, and upload your Excel spreadsheet.
- Edit each driver’s details as needed, and save your list of drivers.
- You can also add drivers manually, by going to Administration – Drivers – Add Driver.
2. Setting up Realtime Order Tracking
HELP TOPICS: For a detailed guide, go to Realtime Order Tracking
- You can turn Realtime Order Tracking on and off as often as you need to, depending on your preferences.
- Go to the Administration dropdown menu and select Settings, then select Order Tracking at the bottom of the menu at the left of the screen.
- Click on the Order tracking enabled checkbox. A blue tick means that the feature is on.
- Below this, there is a checkbox for email notifications and a checkbox for text message notifications. Ensure that both checkboxes are ticked if you want to send both emails and text messages, or just select one or the other.
- To continue customizing the Realtime Order Tracking feature, follow the instructions outlined in Step 2 of the Realtime Order Tracking Help Topic.
3. Importing orders with customer contact details
HELP TOPICS: For a detailed guide, go to Orders and Realtime Order Tracking; to watch a video tutorial, go to How to Import Orders From an Excel Spreadsheet
- Create an Excel spreadsheet with orders that you want to deliver on a particular day. Include customer email addresses and/or cell phone numbers, so that you can send them Realtime Order Tracking notifications. You can use the template provided here.
- Go to Import Orders and upload your Excel spreadsheet (in the same way that you uploaded the driver list!)
- When you complete the import, you’ll see your order list and the order locations on the map.
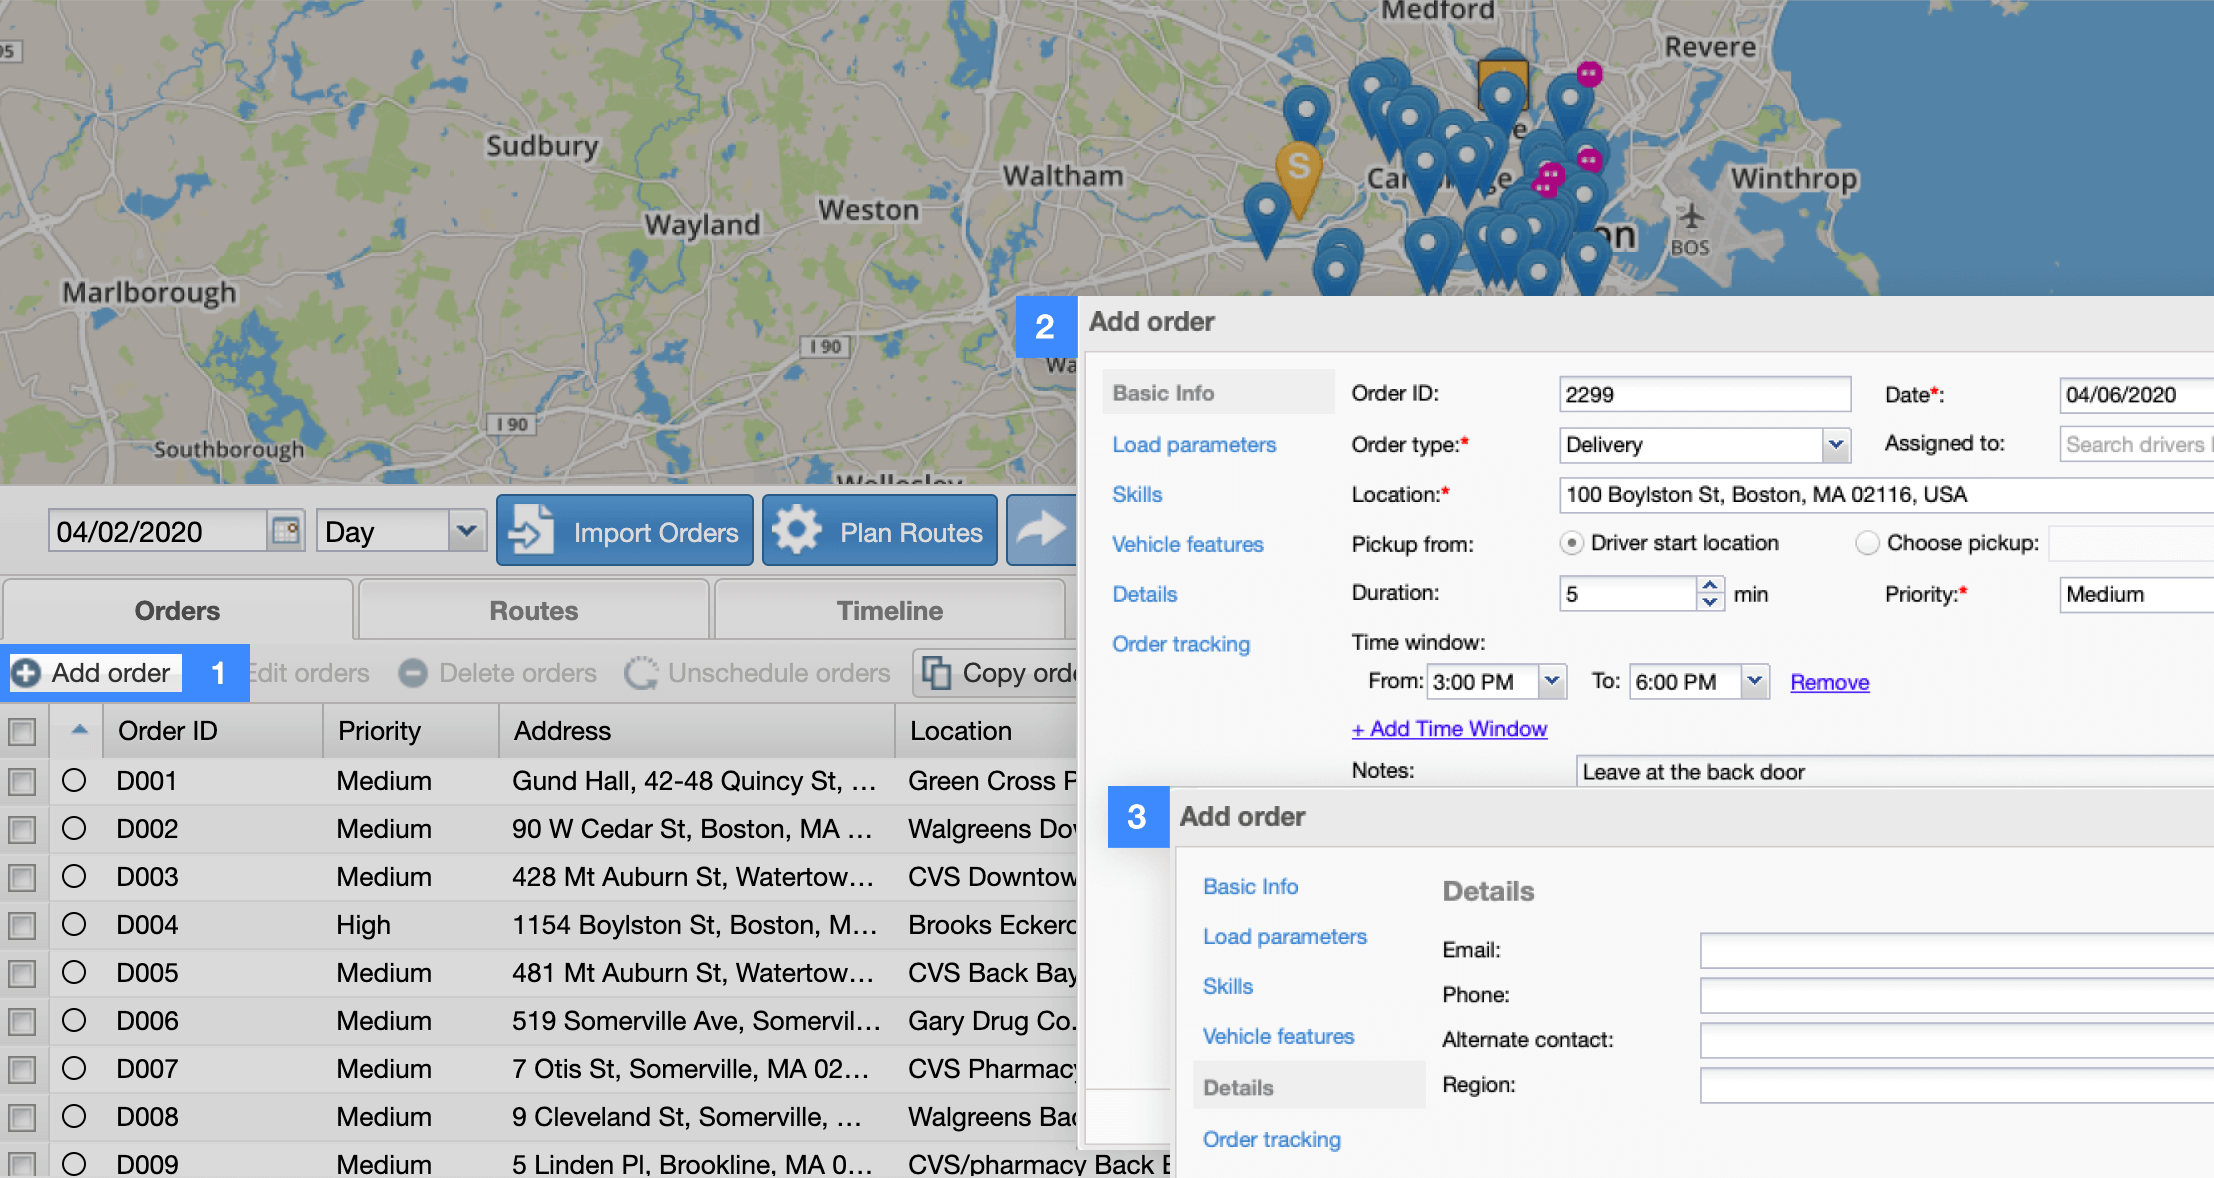
- You can also insert customer orders directly into OptimoRoute by using the Add order option.
- When you click on Add order, the box that opens up will have a menu on the left. Click on Details to add customer contact information, to be able to send them Realtime Order Tracking notifications.
4. Planning routes
HELP TOPICS: For a detailed guide, go to Plan and Optimize; to watch a video tutorial, go to How to Plan Orders; for a detailed guide to planning multiple days or weeks at a time, go to Weekly Planning
- Select the date that you want the deliveries to take place, then click on Plan Routes.
- Make adjustments as needed in the Planning Settings box that appears, then click on Plan routes.
- A few seconds later your routes will be planned and visible on the map – each driver with their own color.
- You can also create an efficient schedule for multiple days at a time – which is perfect if you have orders that span across a week. Go to our detailed guide to Weekly Planning to learn how it works.
5. Sending routes to drivers via the mobile app
HELP TOPICS: For a detailed guide, go to Send and Export Routes and Mobile App
- Go to Share Routes and click on Send to driver app, then click on Send Now.
- Now your drivers are ready to go! They have all of their deliveries and turn-by-turn instructions in one location.

6. Sending customers Realtime Order Tracking notifications
HELP TOPICS: For a detailed guide, go to Realtime Order Tracking
- Before you can send text messages, make sure you have enough credit on your account. Go to Administration → Billing to purchase credit and check your account.
- Notification emails and text messages can be sent in advance or on the day that the service will take place – as long as the order has been scheduled.
- Click on the Share Routes dropdown menu and select Send order notifications.
- Check the information in the box that appears – if it is correct, click on Send notifications.

- The gray status bar lets you know whether the emails and text messages for the date selected have not been sent (orange) and sent (green).

- Once notifications have been sent, a Notifications tab will open up.
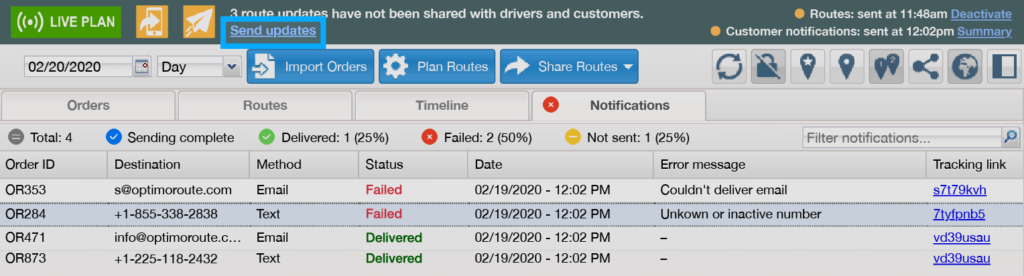
- Here you’ll see the delivery status of each email and/or text message. You can fix the contact information for any failed deliveries, then resend by clicking Send updates.
- If you add new orders to routes for which notification emails have already been sent, you’ll see a reminder on the gray status bar – click on it to send notifications for newly added orders.
Features You Need to Run a Smooth Delivery Service
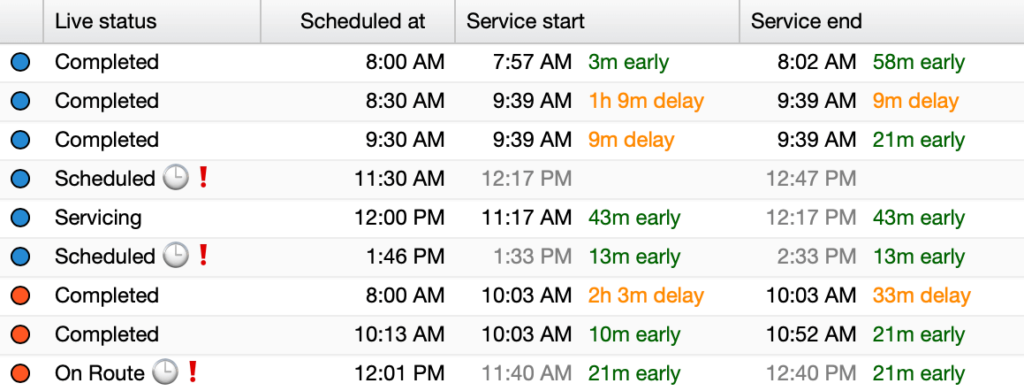
Live Tracking
Know where your drivers are at all times and see live delivery status updates
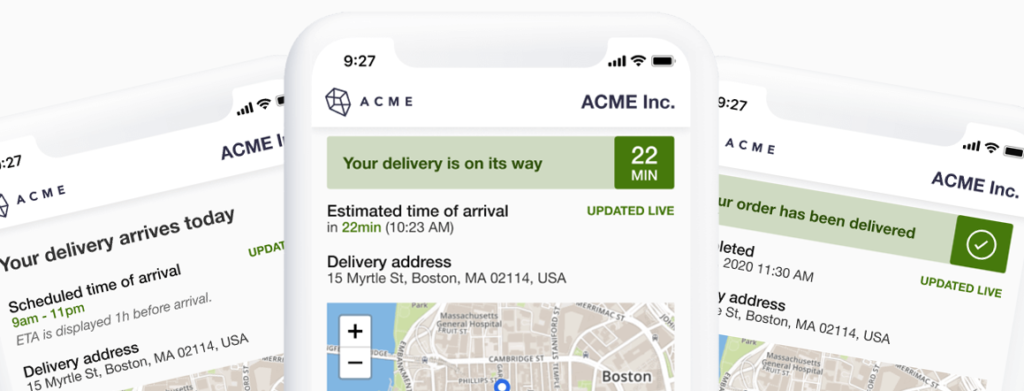
Realtime Order Tracking
Keep customers in the loop – send them an order tracking link via email or text message
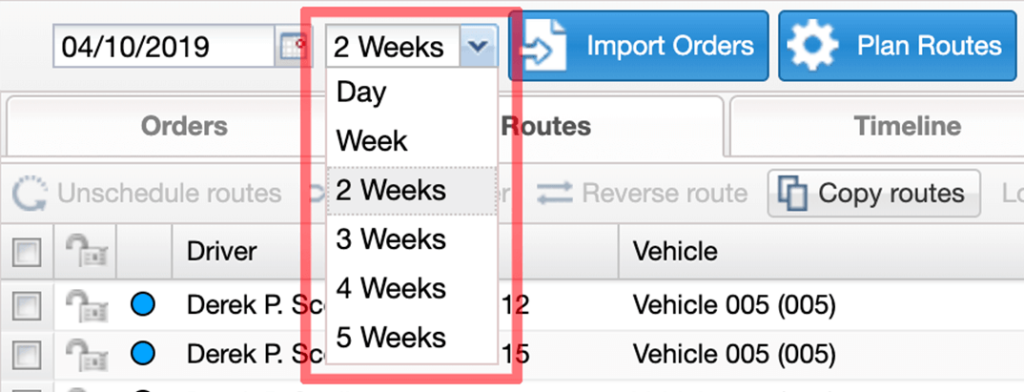
Weekly Planning
Combine your timing constraints and flexibilities – plan the most efficient schedules for up to 5 weeks at a time

Explore our Help Topics
Everything you need to know about setting up and using OptimoRoute – all in one place
Try OptimoRoute™ for Free
No installation or credit card required