Weekly Planning is ideal when you have a flexible time frame for completing orders. For example, use it to create optimized and efficient routes for orders that need to happen within a certain week or month.
You can plan up to 5 weeks at a time, and still accommodate multiple scheduling constraints.
The feature is available to all customers on a Pro account – contact Customer Support to activate Weekly Planning or to upgrade your account.
Getting Started
Go to the Plan and Optimize tab and upload orders that span a time frame longer than one day. (See below for information on additional columns supported with Weekly Planning)
Go to the dropdown menu next to the calendar and select the period within which you want to plan:
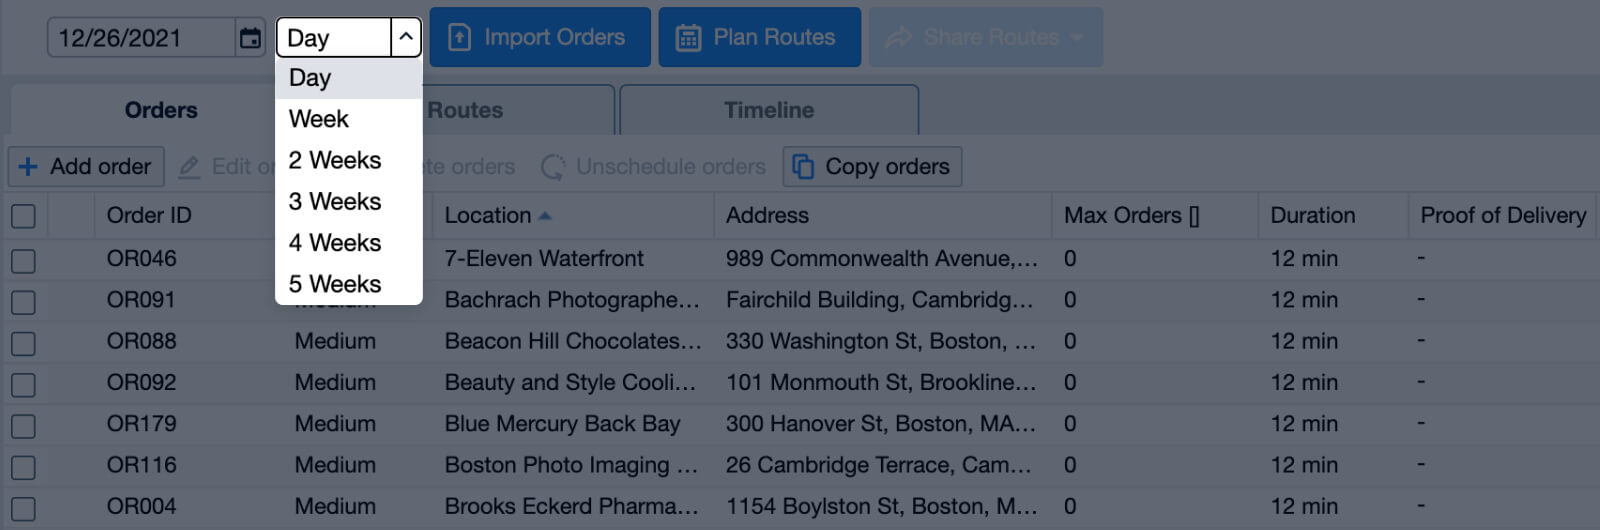
The period selected is your planning range.
By default: Weekly plans start on a Monday and end on a Sunday.
You can change your default settings in the top right corner of the Planning Settings window and manually change the days within any planning period.
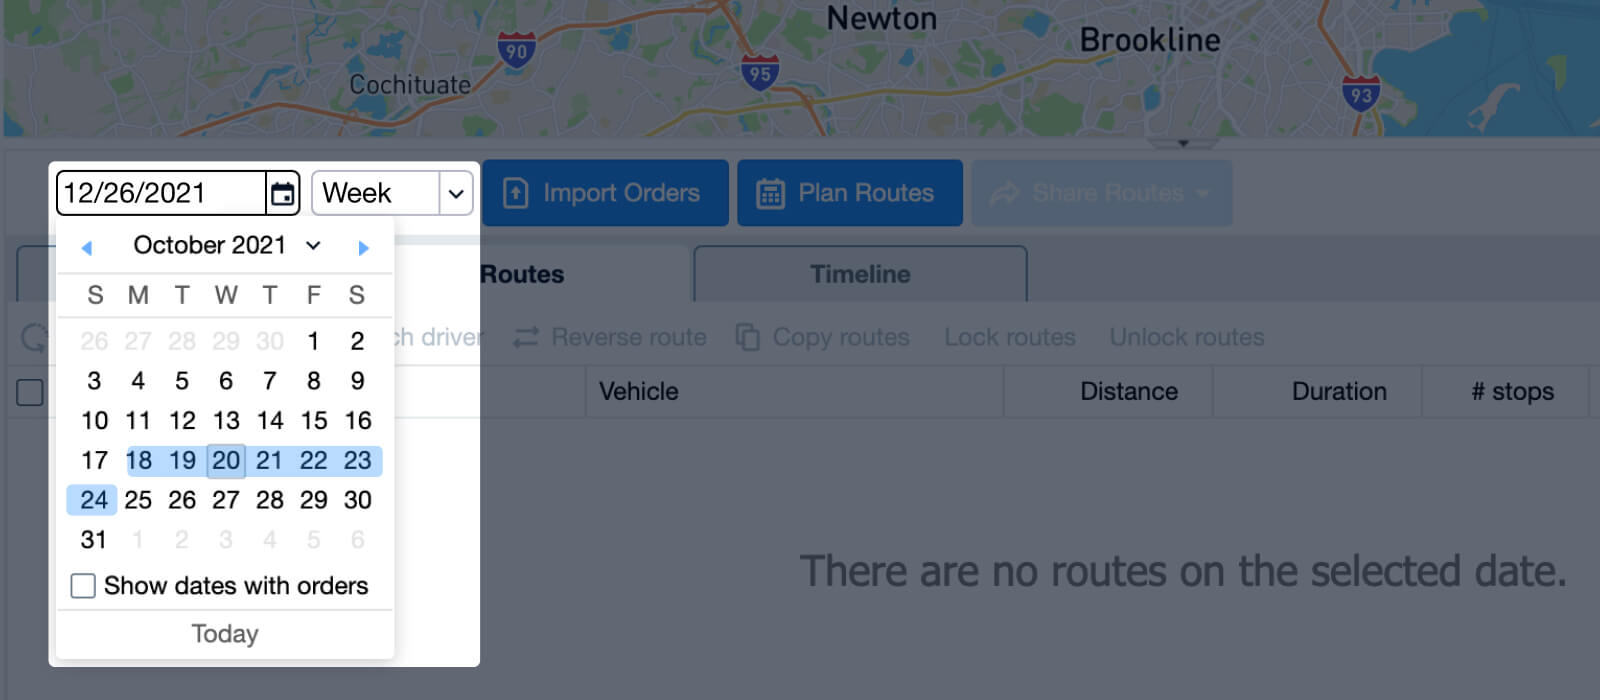
The planning range selected shows all orders and routes within that period in the Plan and Optimize tab.
For example: April 20 is the date displayed in the calendar below. Since we are in the ‘2 Weeks’ planning range, we are actually planning for and looking at the two-week period beginning on Monday, April 19 and ending on Sunday, May 2:
Planning Routes With Weekly Planning
- Click Plan Routes
- Make adjustments according to your constraints in the Planning Settings window. See the section below: How to Add Multiple Constraints.
- Click Plan Week (or, this button will say Plan 2 Weeks, etc. depending on the time frame selected).
- Because there might be changes throughout the week, you still need to send routes to drivers each day. Click here for more information on how to send routes to drivers.
How to Add Multiple Constraints
You can add multiple order and driver constraints to your schedules. The routes and schedules that OptimoRoute plans will take all of these into account.
Time-Day-Date Constraints for Orders
These constraints can be added in 2 ways: in the Edit order box, or on your import file.
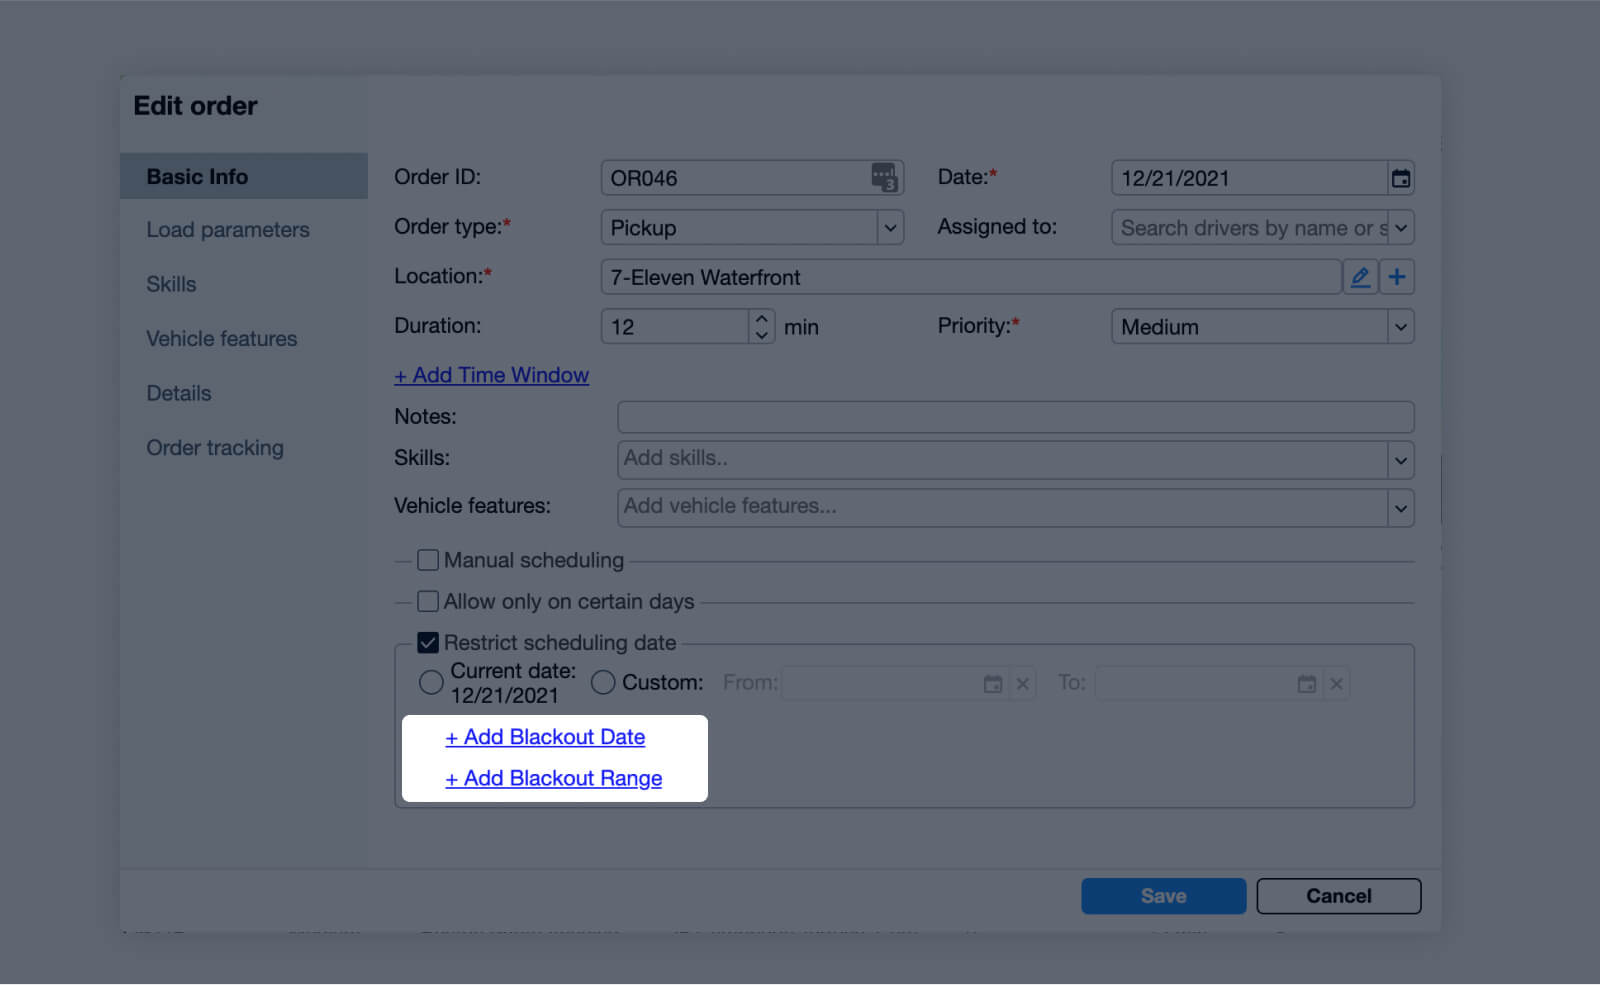
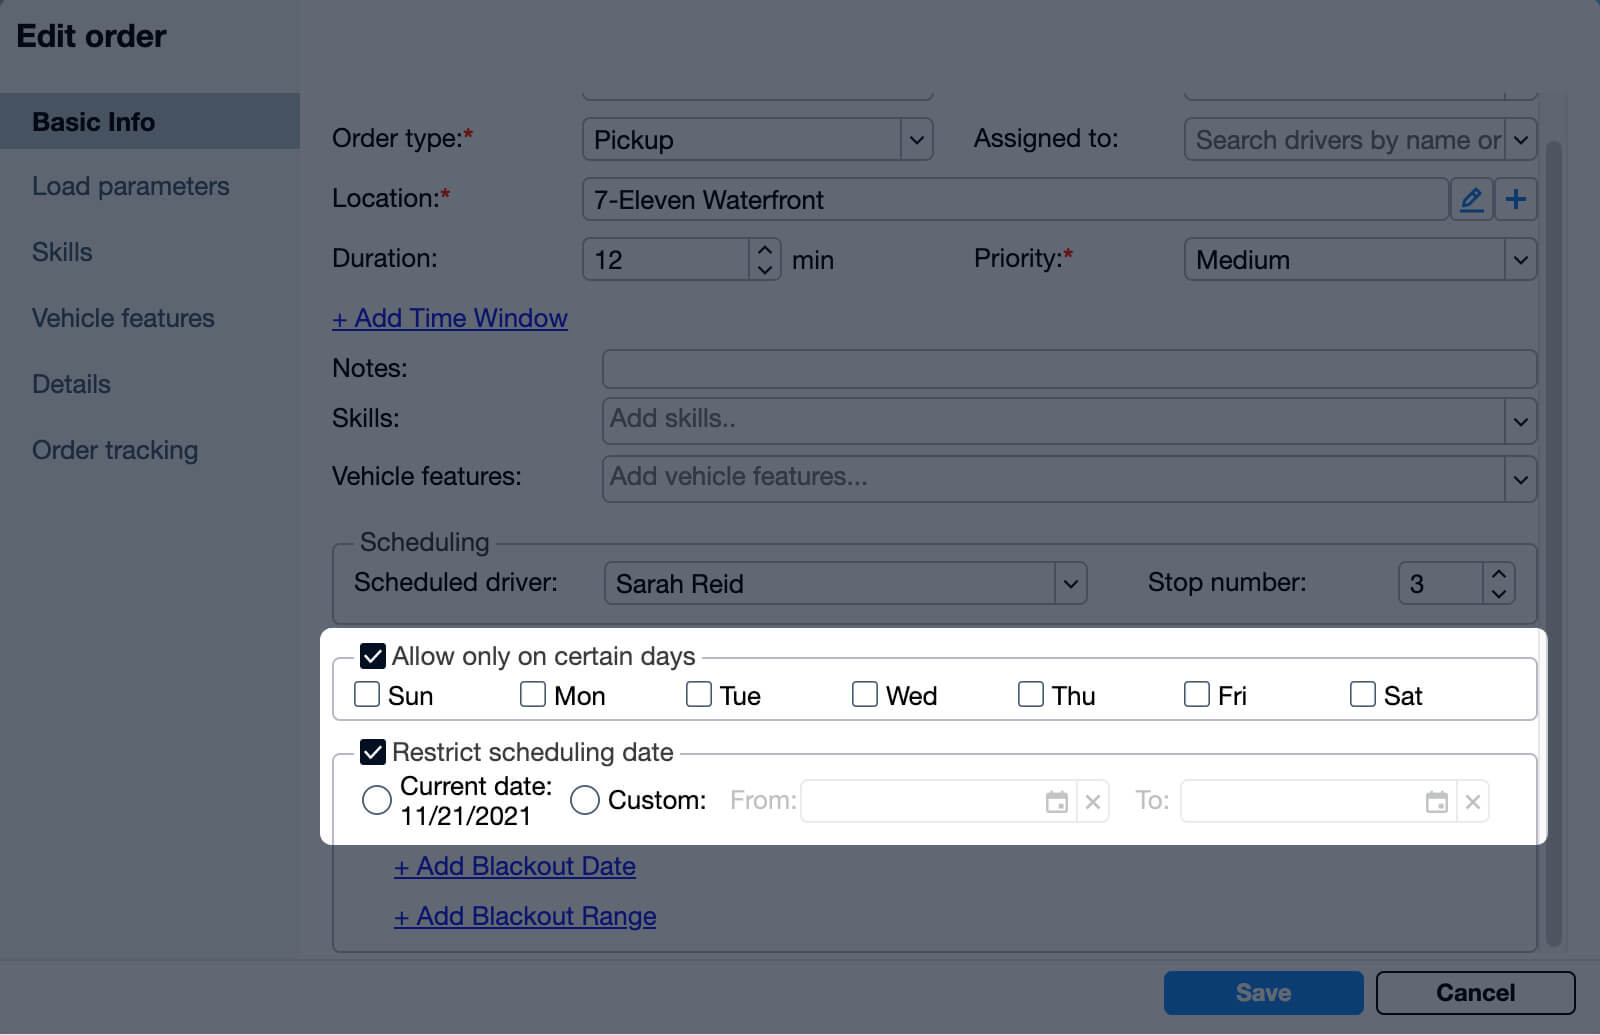
1. Via the Edit Order Box
At the bottom of the box you can set days and/or dates as constraints:
2. Via the Import File
Add columns with the following information, depending on the constraint:
Allowed day or days of the week (e.g. M, T, Th or Mon, Tue, Thu)
→ When importing, map this to Allowed Days
Allowed date (e.g. 2/26 or 26 Feb)
→ When importing, map this to Only on Date
Earliest date, or latest date, or both as a range (e.g. 2/26-2/27 or 26 Feb-27 Feb)
- When importing, map the earliest date column to Earliest Date
- When importing, map the latest date column to Latest Date
- When importing a range, map to both Earliest Date and Latest Date
Driver Constraints: Start and Finish times and Vehicle Assignment
When you click Plan Routes, the Planning Settings box will appear.
The Basic view tab lets you adjust constraints one date at a time.
Go to the Advanced view tab to easily adjust multiple driver constraints within the entire planning time frame.
You’ll see a grid where Drivers are listed vertically to the left, and the dates within your planning time frame are shown along the top:
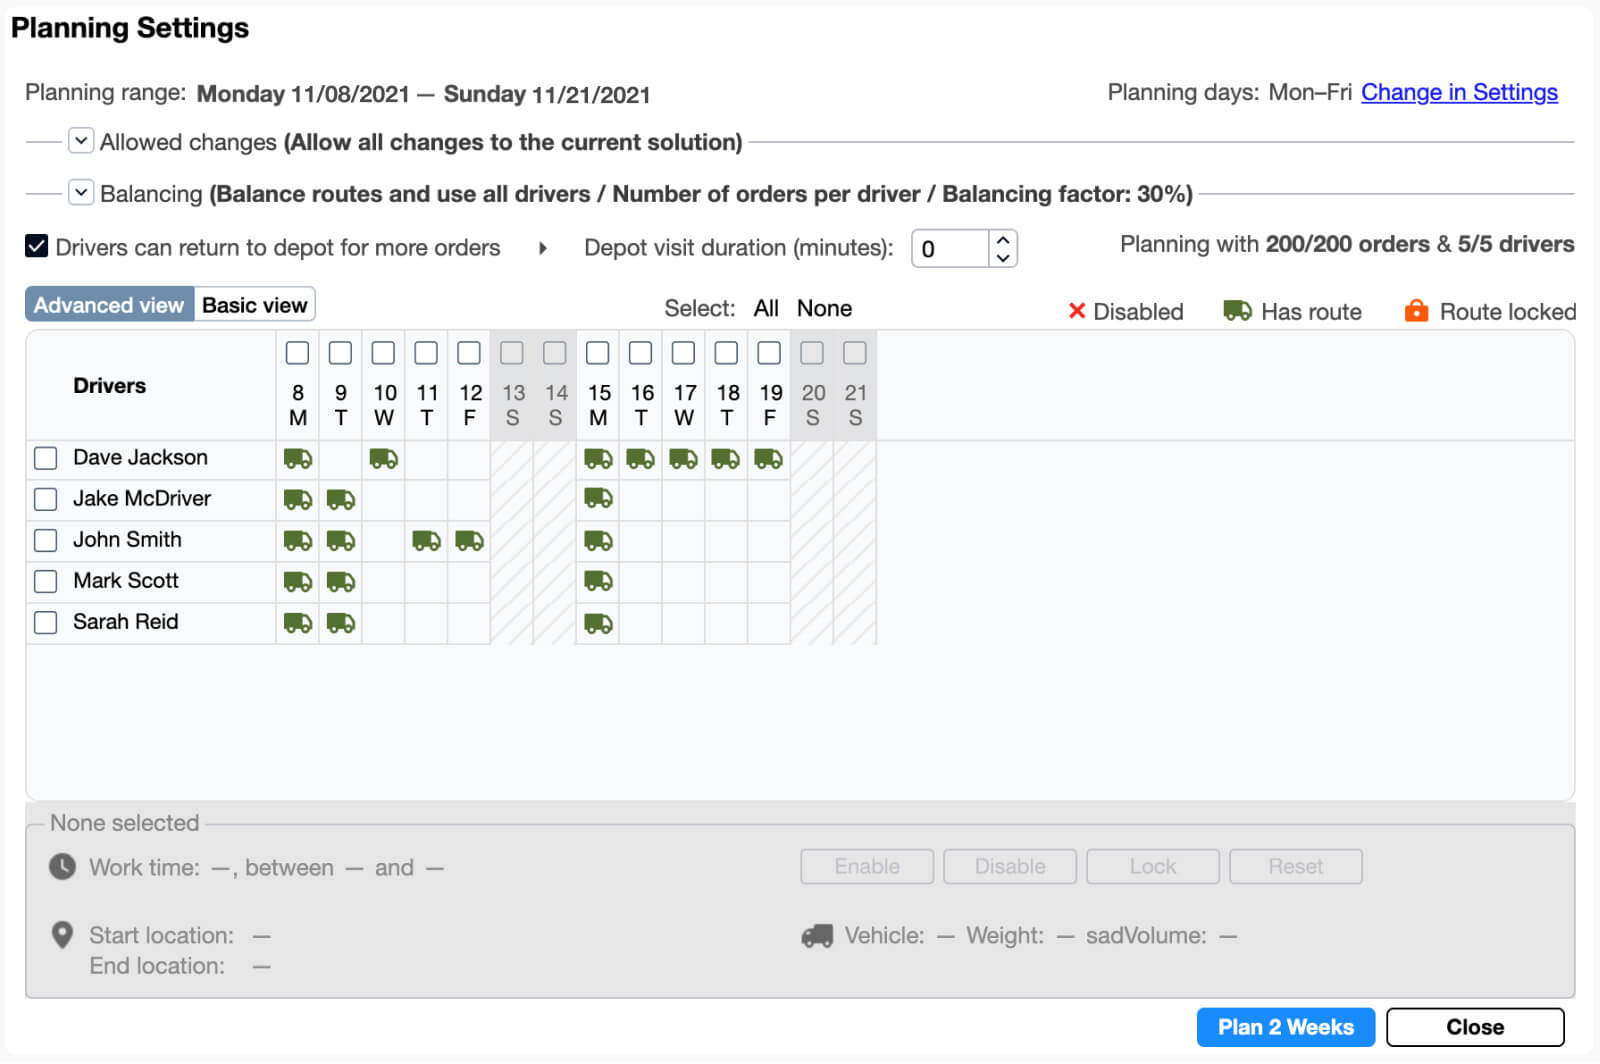
Define the driver/s and date/s that will have constraints applied:
- Select driver/date cells individually by clicking on them directly. They will turn gray when selected, click on the cell again to unselect it.
- Select all of the dates for a driver by clicking on the checkbox next to the driver’s name. Click on the checkbox again to unselect it.
- Select all of the drivers for a date by clicking on the checkbox above the date. Click on the checkbox again to unselect it.
To set start and finish time: make the adjustment where you see Work time.
To set vehicles: make the adjustment where you see Vehicle.
To set driver availability status:
→ Disable indicates that drivers are unavailable for the selected dates.
→ Enable indicates that drivers are available for the selected dates.
→ Lock indicates that the planned routes for that driver and date cannot be changed.
→ Reset will remove the above constraints for the drivers and dates selected, and restore the default settings.
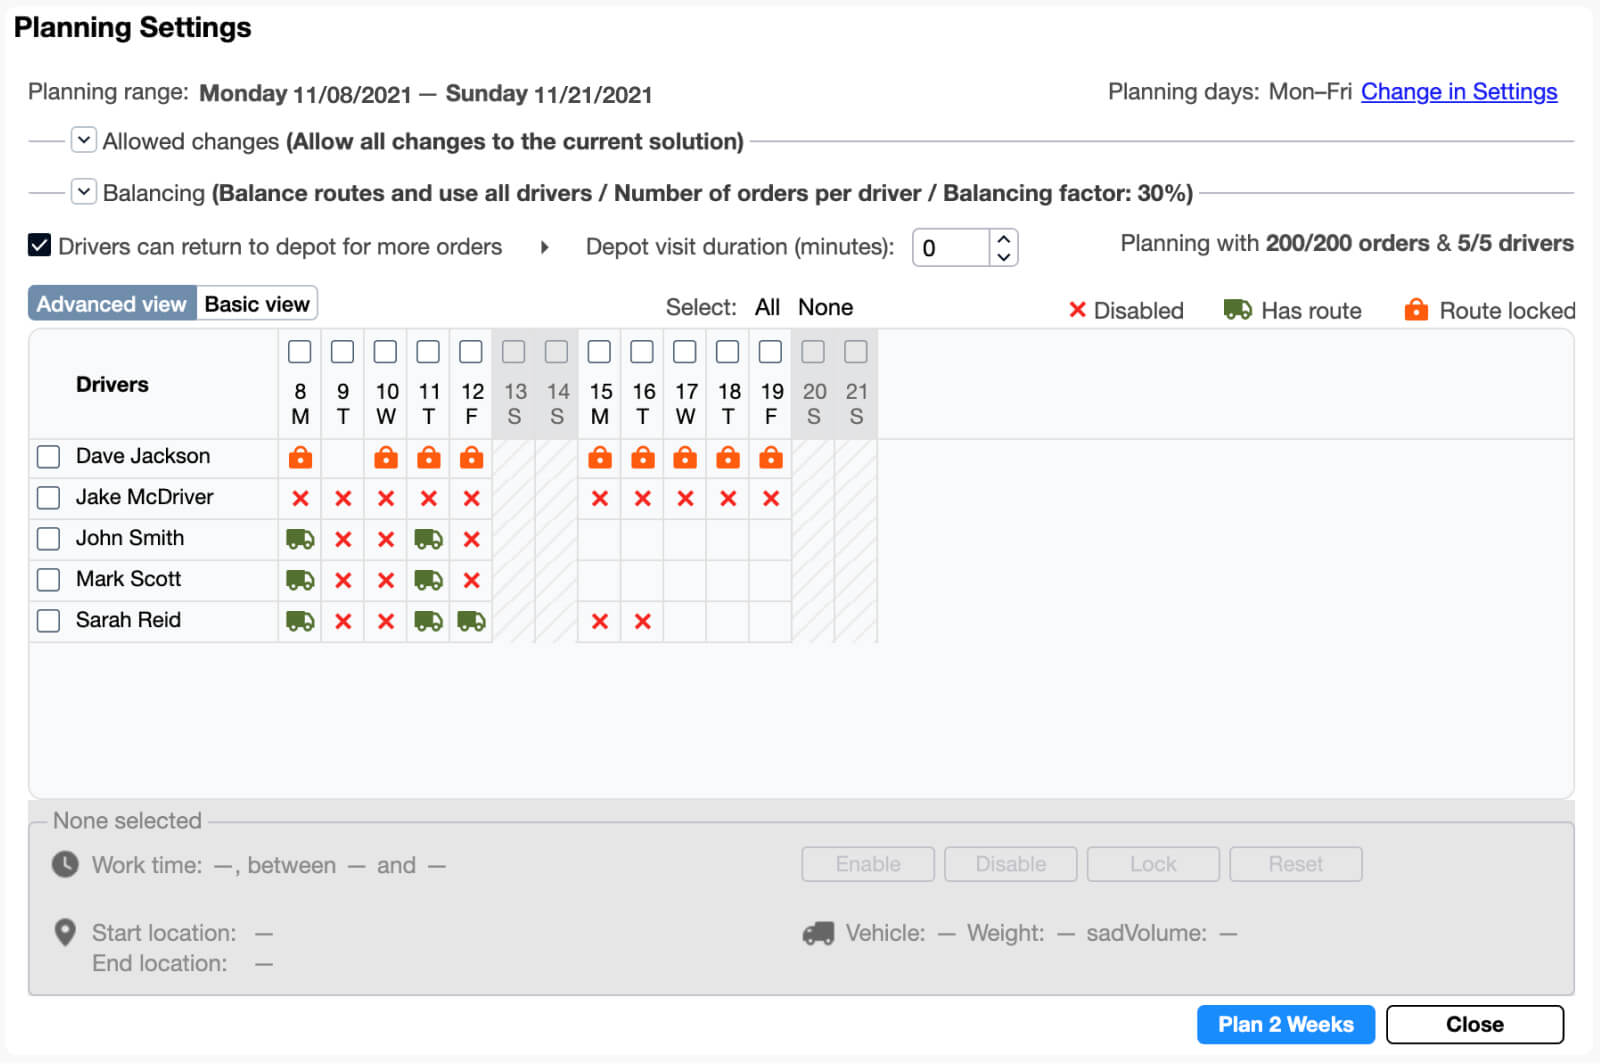
The example reflects multiple constraints which have been set in the Advanced view tab:
- The routes are to begin on Monday 11/08 and end by Sunday 11/21.
- Tuesday 11/09 – Wednesday 11/10 are disabled for all drivers.
- Dave already has route assignments, and we don’t want to change them (all of Dave’s scheduled routes are locked).
All non-working days are disabled for the following drivers:
- The whole planning time frame is a vacation period for Jake.
- Friday 11/12 is a non-working day for John and Mark.
- Monday 11/15 and Tuesday 11/16 are non-working days for Sarah.
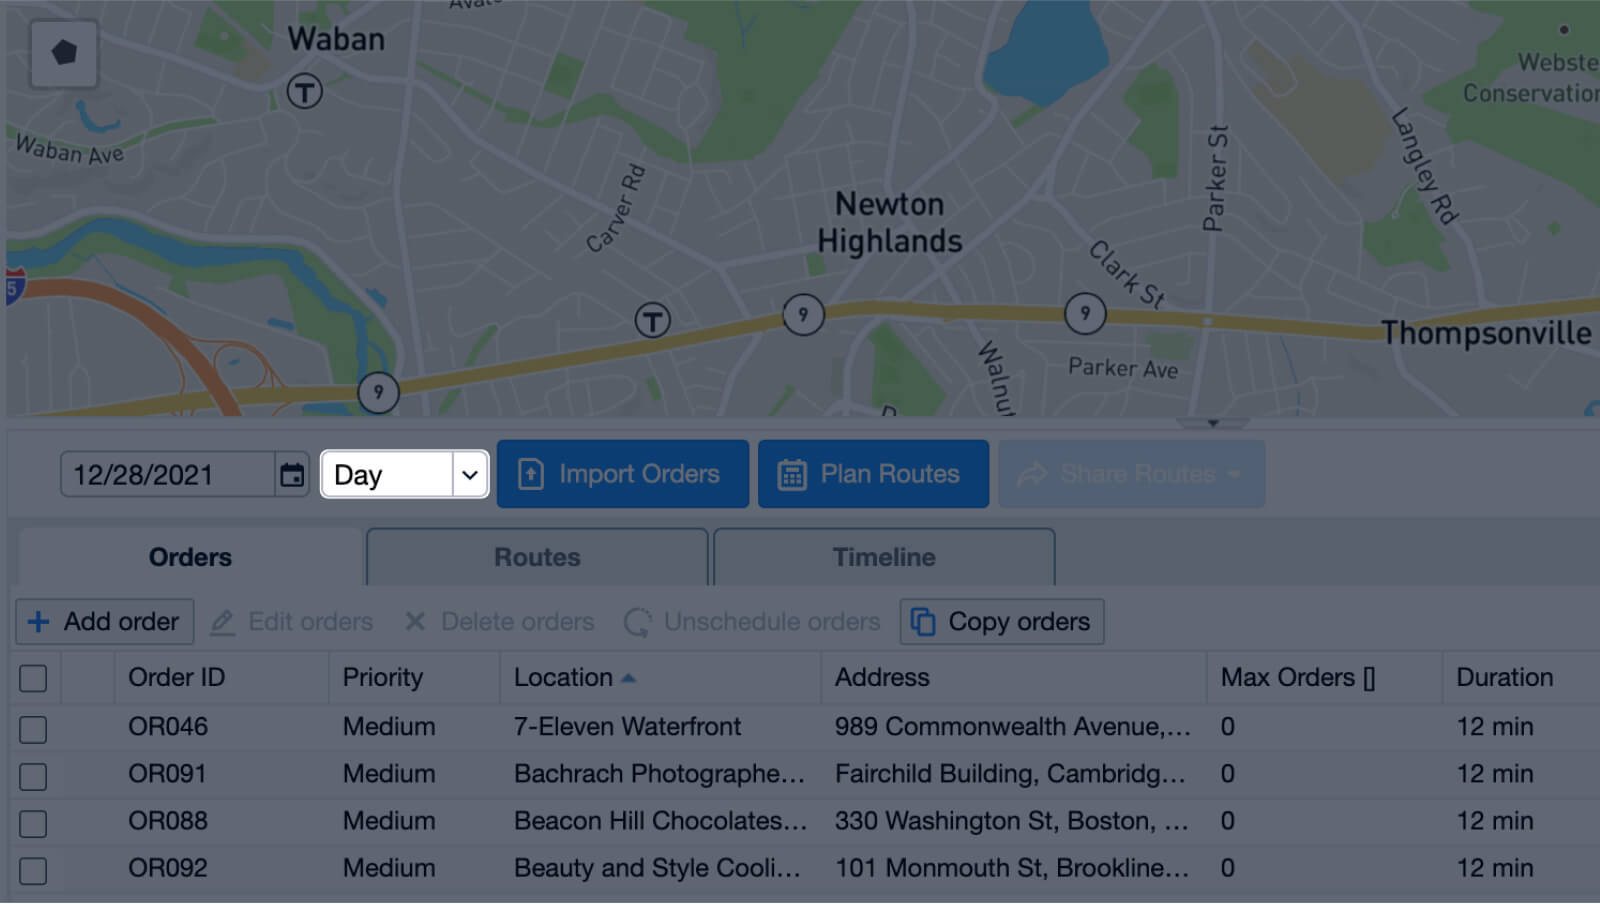
Adjusting the Map View
With a multi-week schedule, you still have the flexibility of viewing routes and orders per day:
or per week/s:
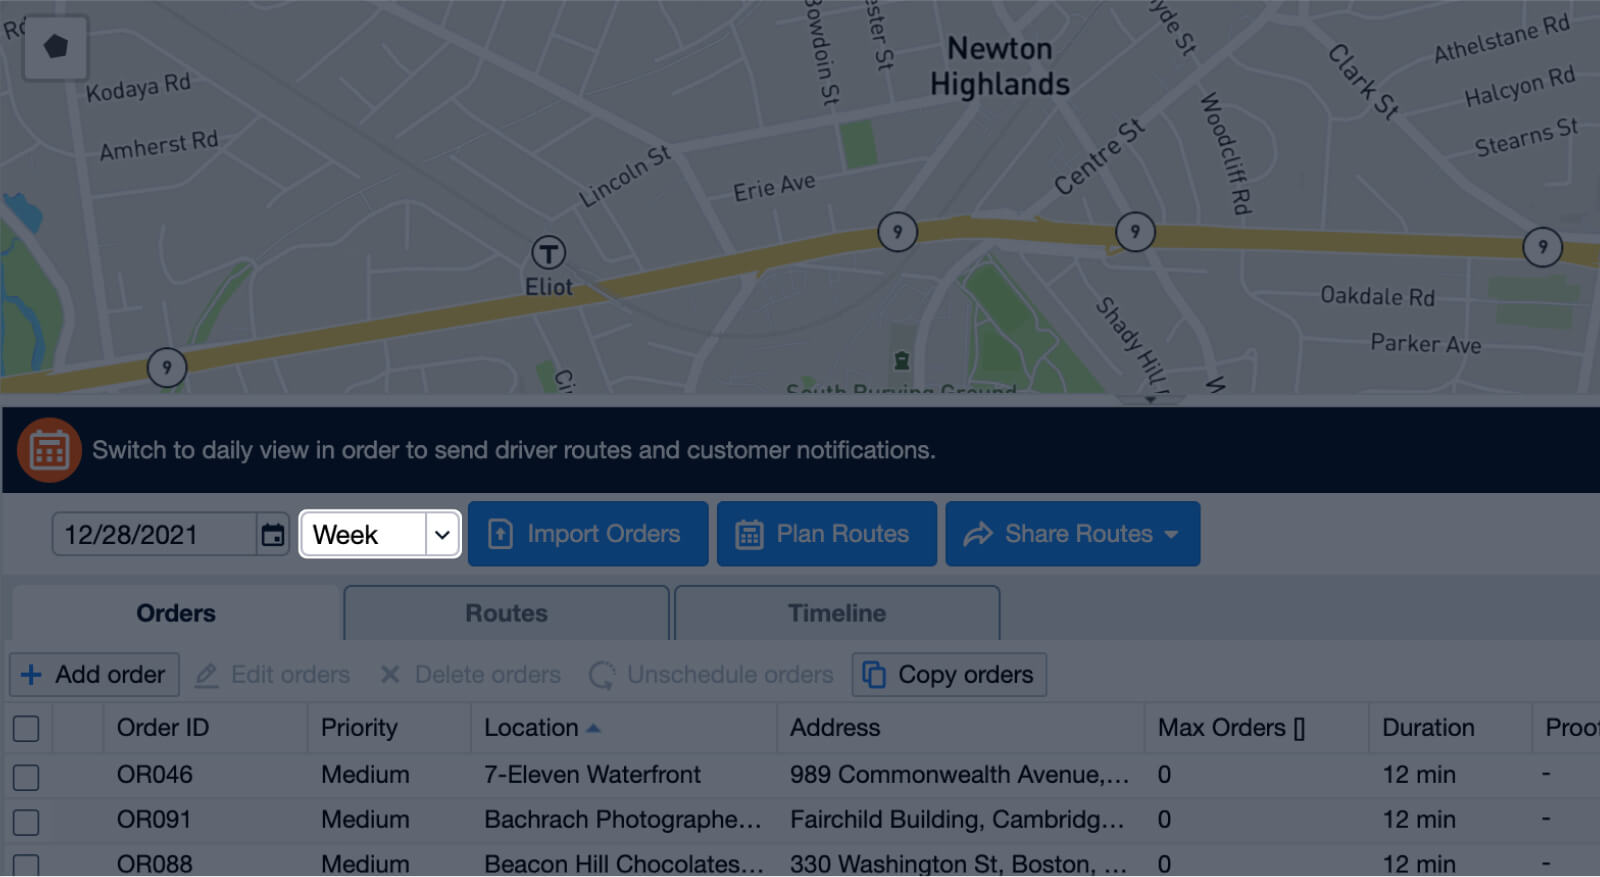
- Select a period on the day/week dropdown menu next to the calendar to determine the route and order information displayed.
- Every driver has their own color. The letter on the pin indicates the day of the week.
- The information shown on the Orders tab and Routes tab corresponds to the period selected in the dropdown menu.
How to Add Blackout Dates or Blackout Date Ranges
There may be particular times when companies aren’t available for deliveries, inspections, maintenance work, etc. If drivers are unable to visit customers on certain days or during a particular set of dates (i.e. holidays or days when customers are particularly busy), then those days can be restricted or “blacked out”. The objective is to help you stay both flexible and organized by knowing ahead of time when your drivers can be off duty.
If you’re planning weekly schedules and there are unworkable dates, you can add a “Blackout Date” column in your spreadsheet, then import and column map it as you normally would. Likewise, if there are several dates that need to be removed from your itinerary, you can apply the same process for regular blackout dates, only in this case you would add “Ranges” to the column name and insert the date ranges accordingly.
Examples of date formats that are supported during import are:
- 07/22/2019,
- 07/22/2019-07/25/2019,
- 07/22/2019, 07/25/2019-07/28/2019,
- 07/22/2019-07/28/2019, 08/05/2019-08/09/2019,
- 2019-07-22 – 2019-07-25,
- 2019-07-22-2019-07-28, 2019-08-22-2019-08-28
This new feature is meant to help you stay a step ahead when planning your routes.