Welcome and thank you for choosing OptimoRoute. This guide will take you through the simple process of creating your account, setting up your drivers and vehicles, planning your first optimized routes, and using live tracking and analytics.
If you have already started the process or you need assistance in specific areas feel free to jump ahead to one of the following sections:
- Import Orders from Microsoft Excel, CSV file, or TXT file
- Plan optimal schedules and routes
- Send Routes to your team via the OptimoRoute™ Driver Mobile App
- Track orders with Realtime Order Tracking
- Confirm completion of orders with Proof of Delivery
- Live Tracking
- Using and understanding Analytics
If you have questions that aren’t answered here, feel free to contact our support staff via email or our support portal.
Let’s get started!
Creating an OptimoRoute™ Account
Start by choosing your company ID (for example your company or domain name), enter your email, and choose a password.
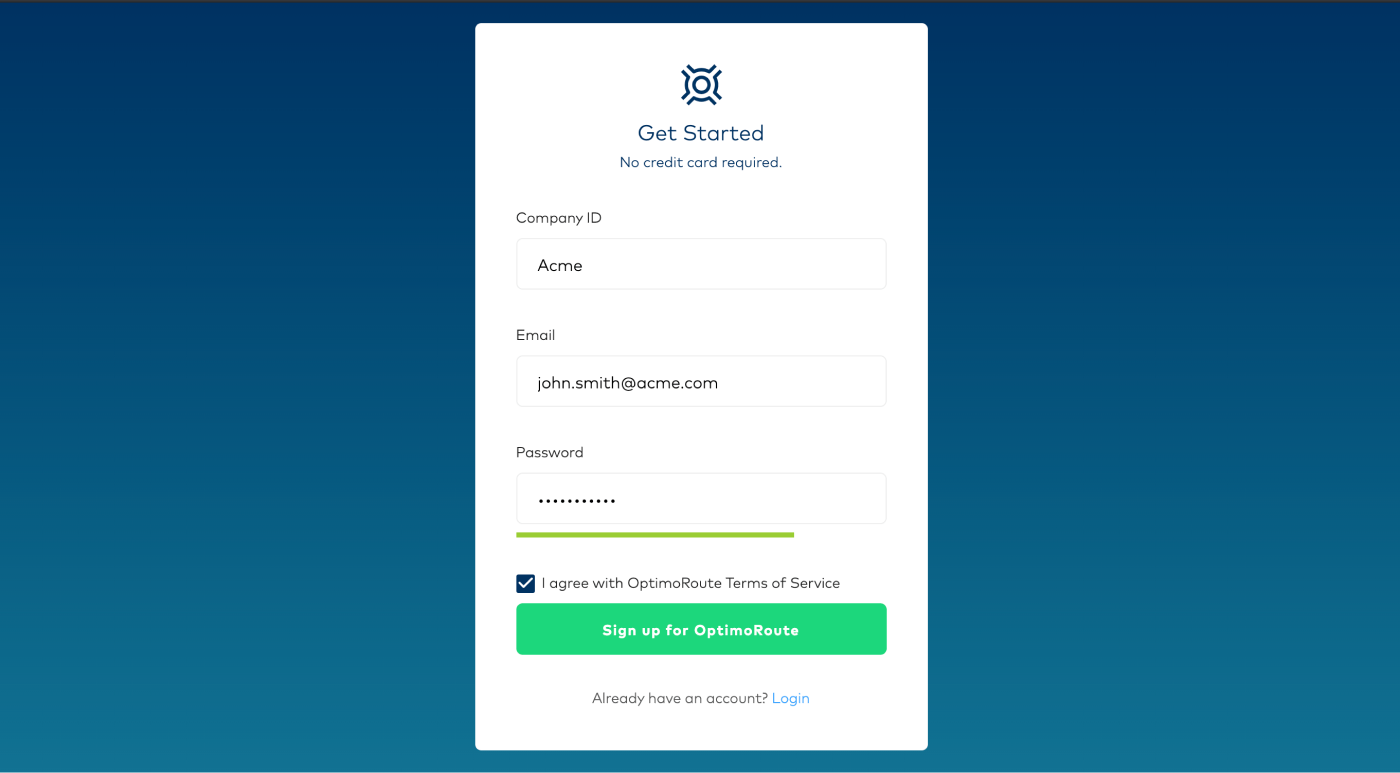
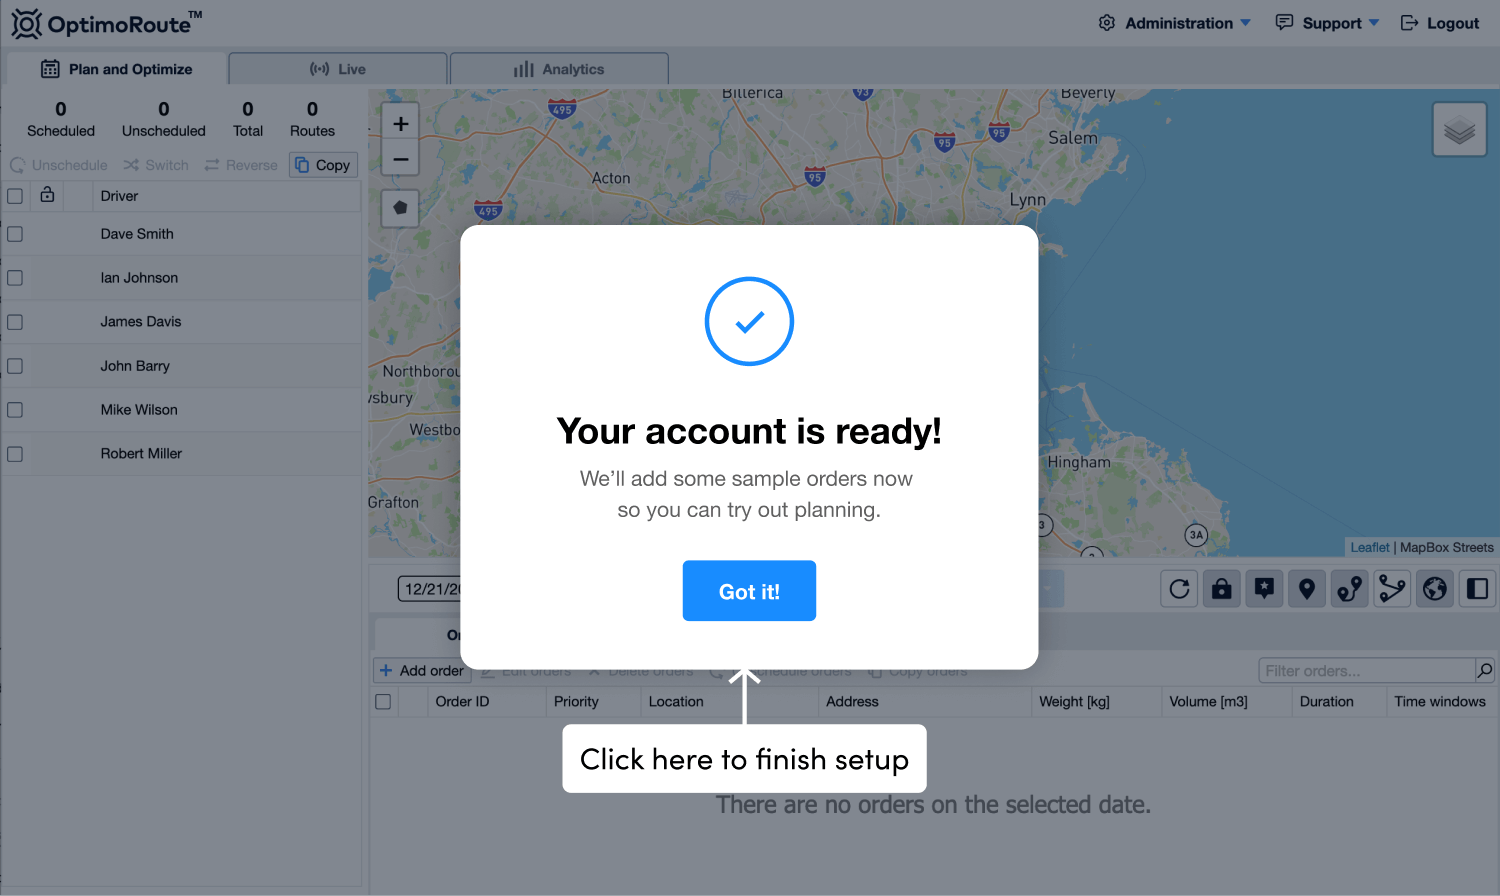
Now that you are logged in, continue with the Getting Started Wizard which will help you set up your account.
Configuring your Account, creating Drivers and Vehicles
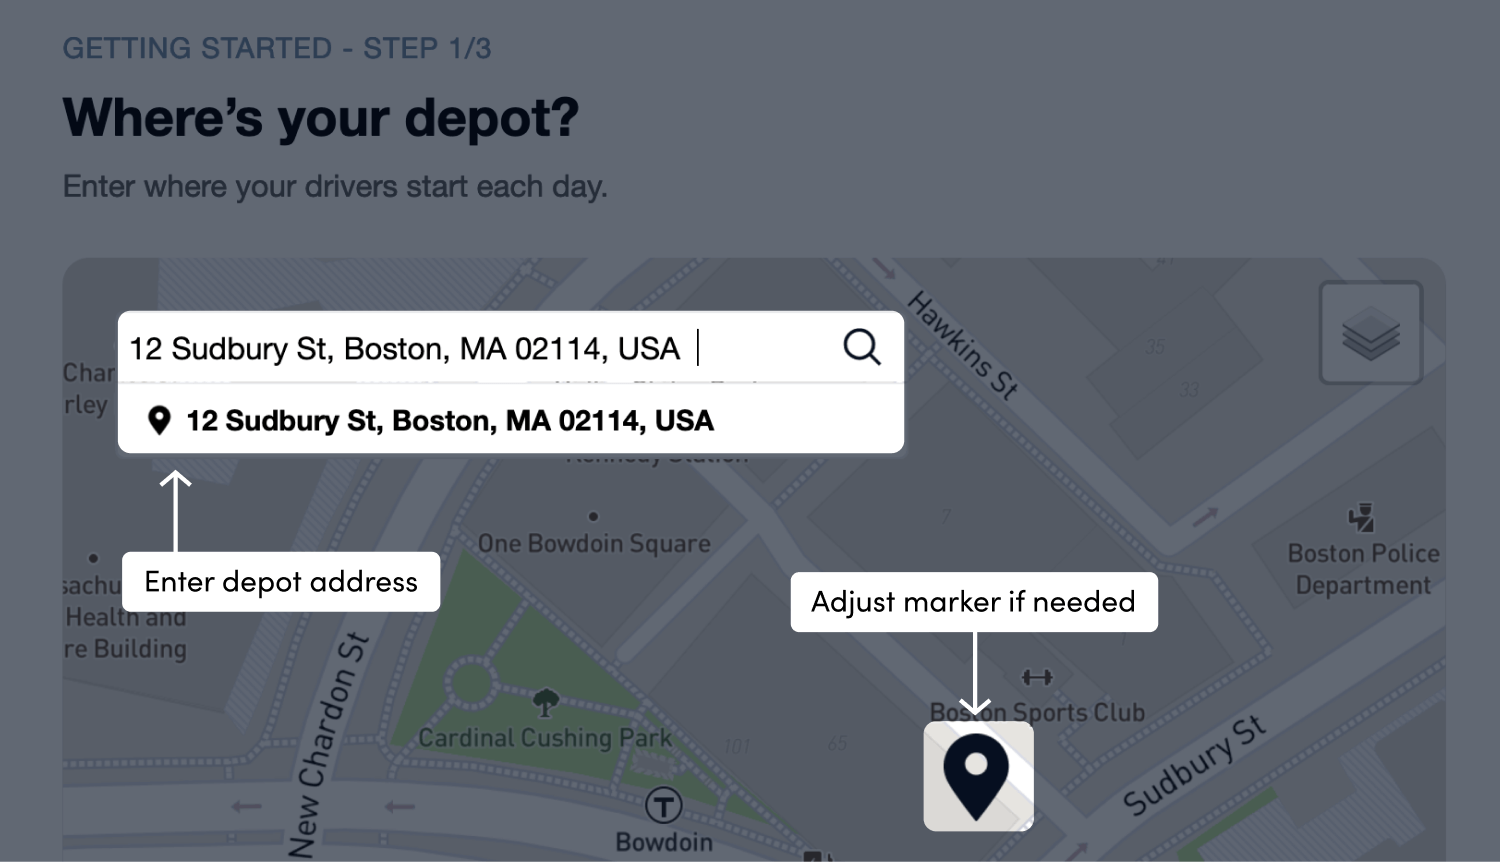
The Getting Started Wizard first asks you to locate your depot location by entering the address in the search bar and selecting the correct address from the drop down. Check the location on the map, and if necessary adjust it by dragging and dropping the marker. This will be used as the start and end location for your fleet. If any drivers start or end at a location different than your depot, click here to find out how to change the start/end locations for individual drivers.
Choosing your business
Start by choosing what your business does from one of the provided options.
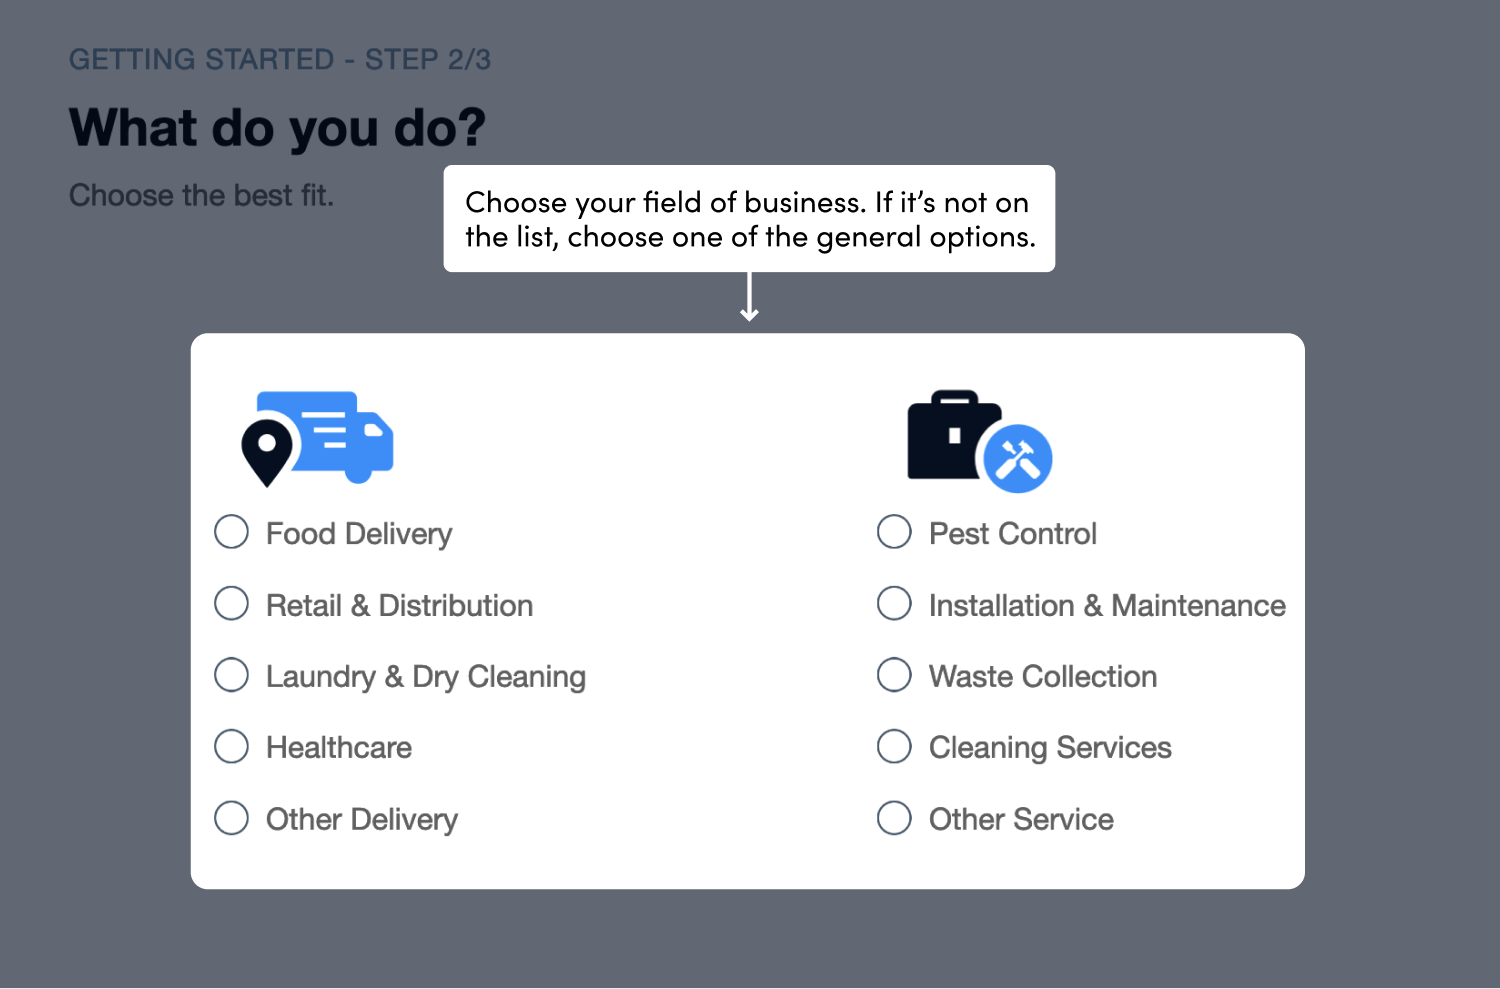
Once you have made your selection, OptimoRoute will automatically choose the best settings tailored for your business. This can also be modified later so don’t worry if you feel that the settings don’t match your needs exactly. You can also choose from two general options (Other delivery or Other service) if your business is not on the list.
Creating Drivers
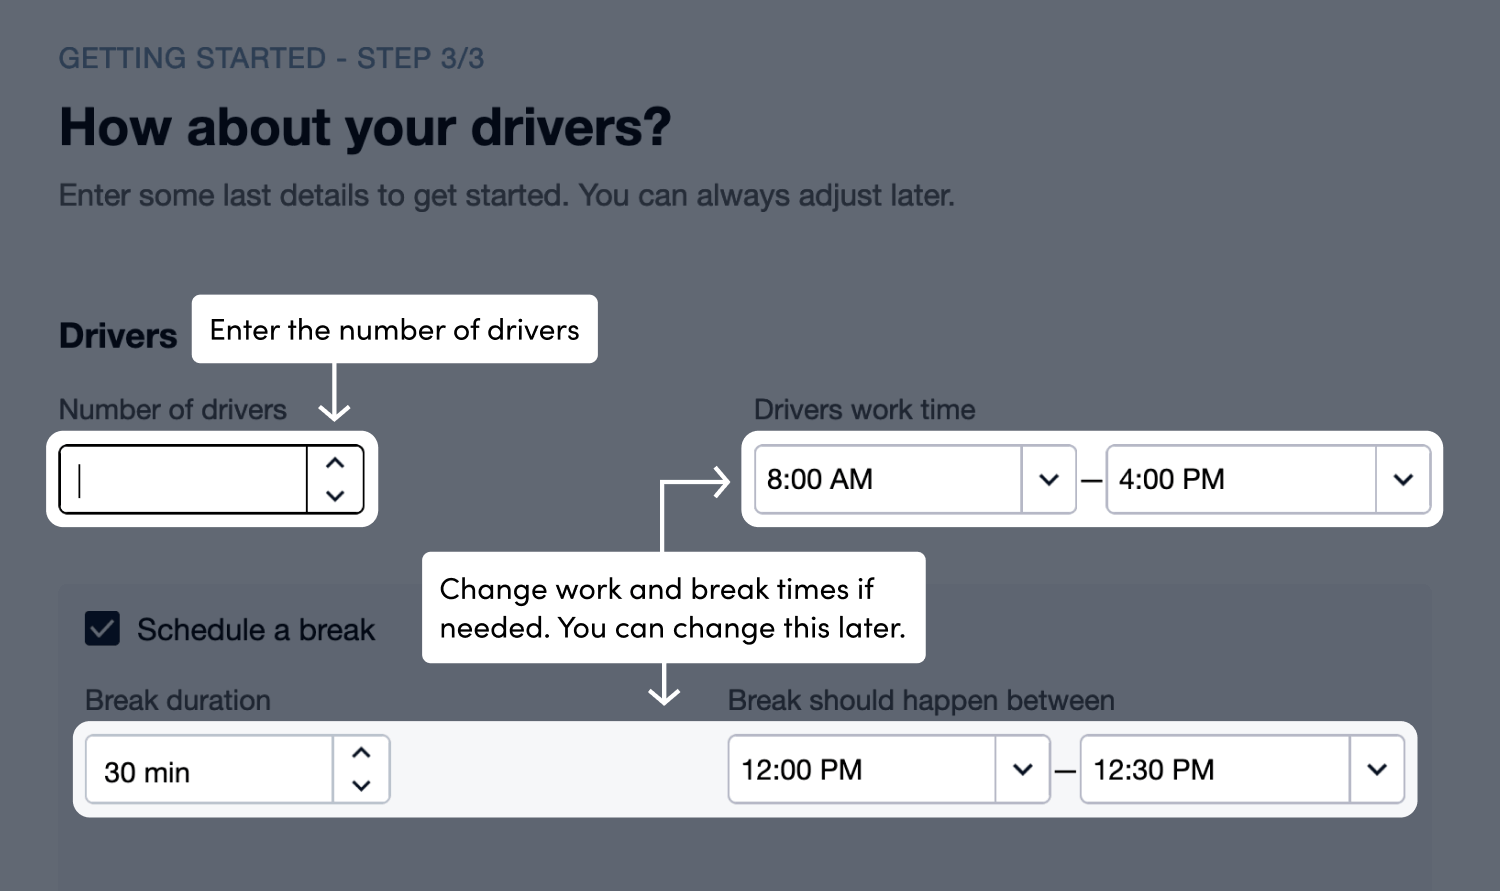
Next, create your drivers. For every driver, one vehicle is automatically created. Adjust the number of drivers by entering a number or clicking the up/down arrows. Set the drivers’ work and break times then click Next.
Import Orders

Next, start by adding some orders for your business. You can use our sample Excel (that’s available here) to get started then delete our data and fill it with your own.
Click Import Orders and select Import from Excel, CSV, or TXT File. Select the prepared Excel file from your computer and click Import.
Any MS Excel file, CSV file, or tab delimited file can be imported as long as it contains one of the following options that define the location (all other fields are optional):
- Street Address, Town/City, State/Province, ZIP Code, Country/Region, or
- Latitude, Longitude
Other non-mandatory pieces of information that can be imported with an order include
- Job duration,
- Skills required,
- Time windows,
- Load size, and more
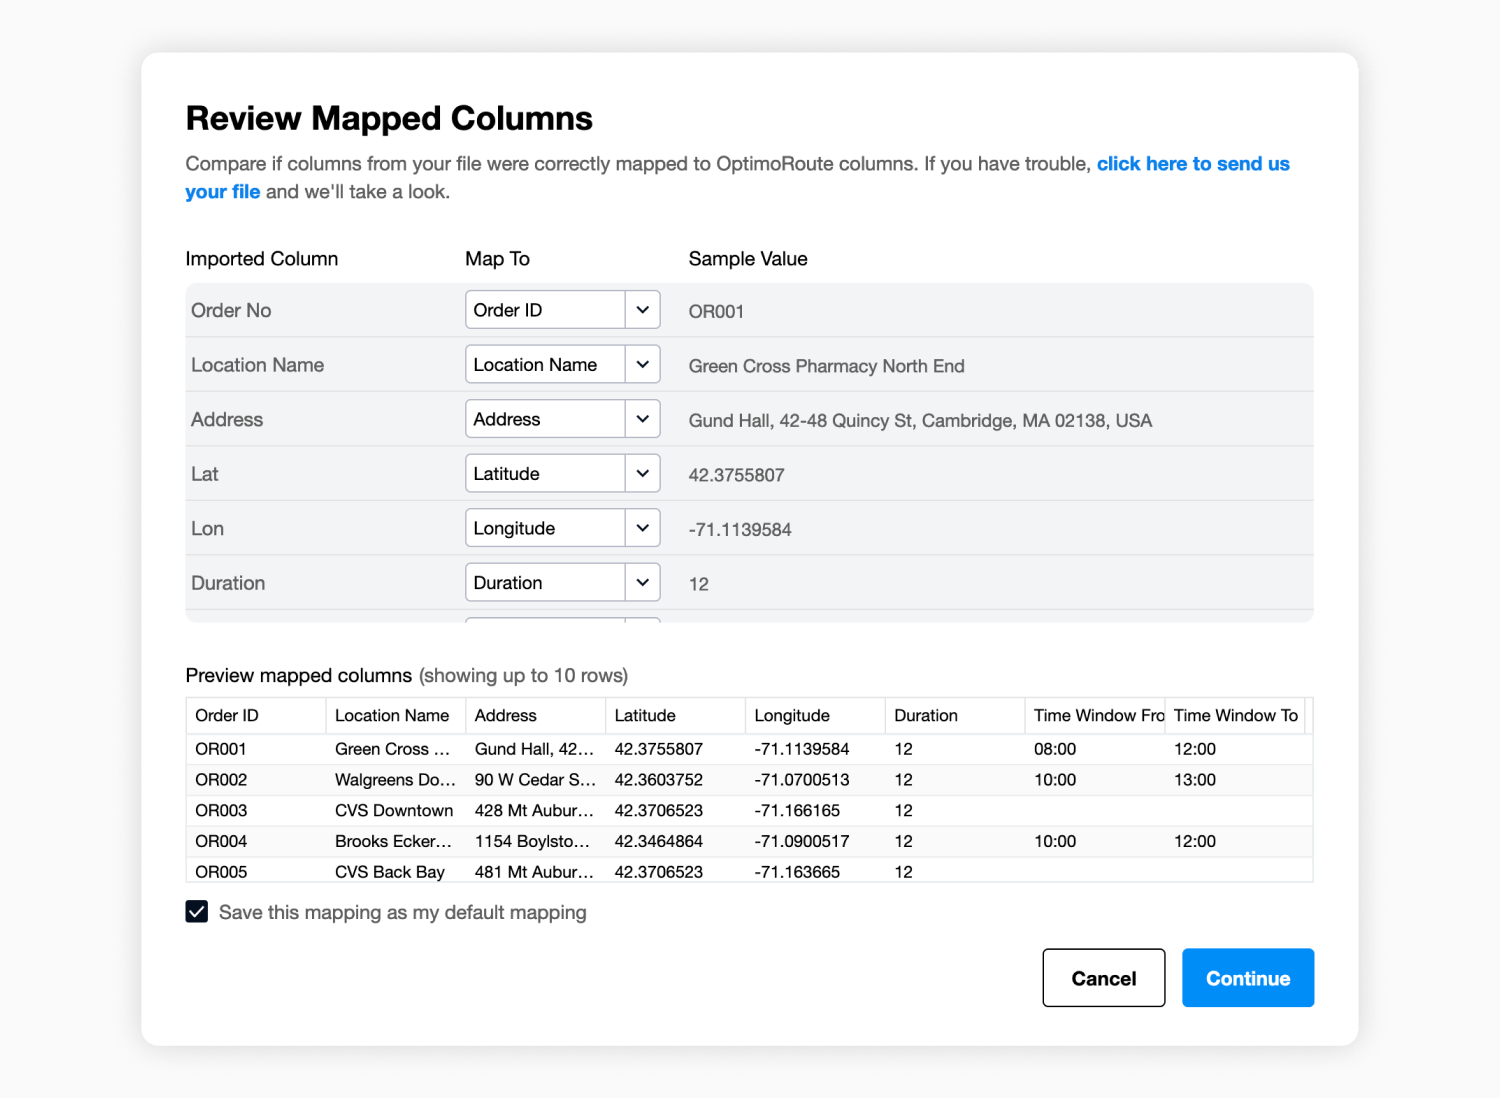
Import Orders – Review Mapped Columns is where OptimoRoute™ will match the columns from your file with the fields in OptimoRoute™. Check to make sure all the information is mapped correctly. Mapping will be saved, so you only have to make corrections once. Once you’re ready, click Continue.
Before completing the import you need to review the orders that will be imported in the Review Imported Orders page.
Possible statuses in the Location Accuracy column are:
- Not Found – address could not be found, location needs to be manually corrected
- Geocoded, Partial Match – new location is created using the supplied address, but found result is only a partial match to the supplied address – should be checked before saving
- Geocoded, Multiple Results Found – new location is created using the supplied address, but multiple results have been found for the supplied address – should be checked before saving
- Matching Location ID – existing location with the same location ID was found in the system
- Matching Location – existing location with the same address and name was found in the system
- Geocoded – new location is created using the supplied address
- GPS Coordinates – new location is created using supplied latitude and longitude coordinates
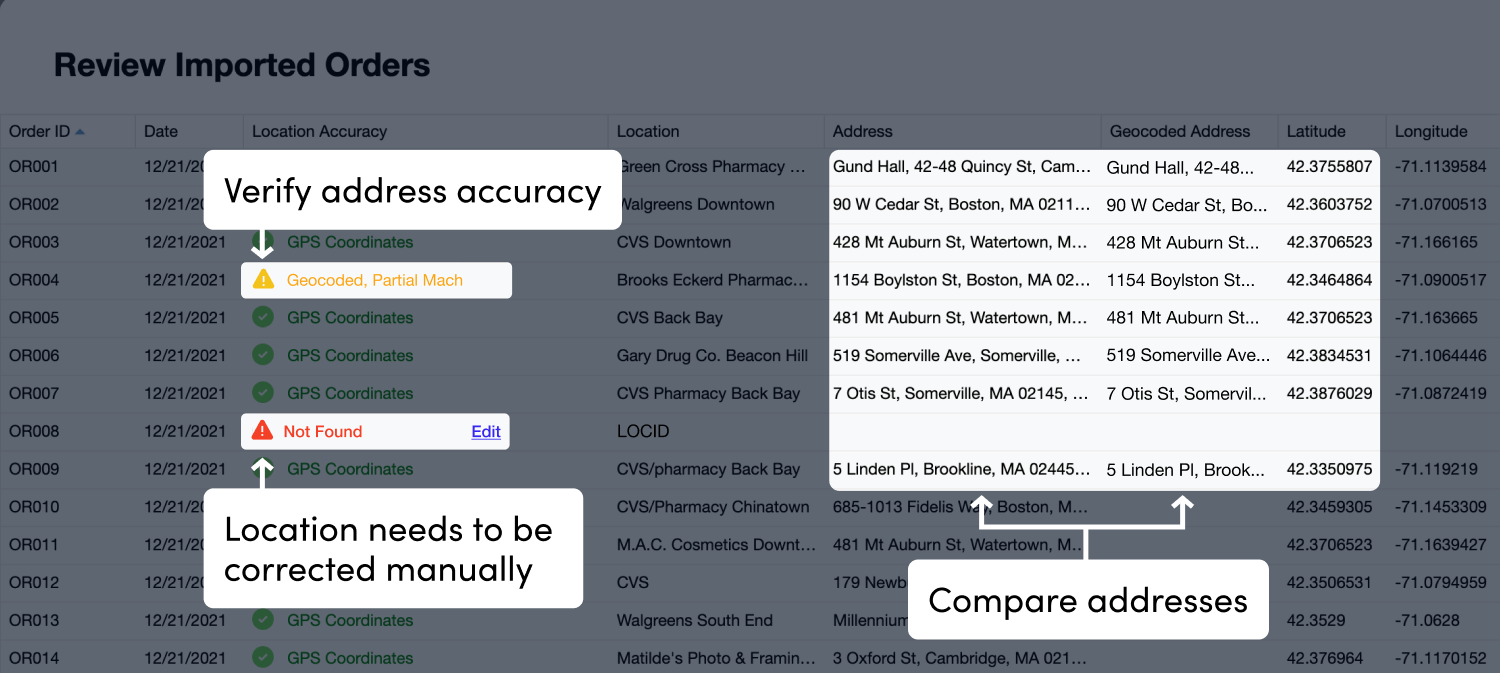
You can correct the Address, Latitude and Longitude, or drag and drop the marker if necessary to the correct location. When you have the right address, the drop-down menu will populate. Select this address and click Save.
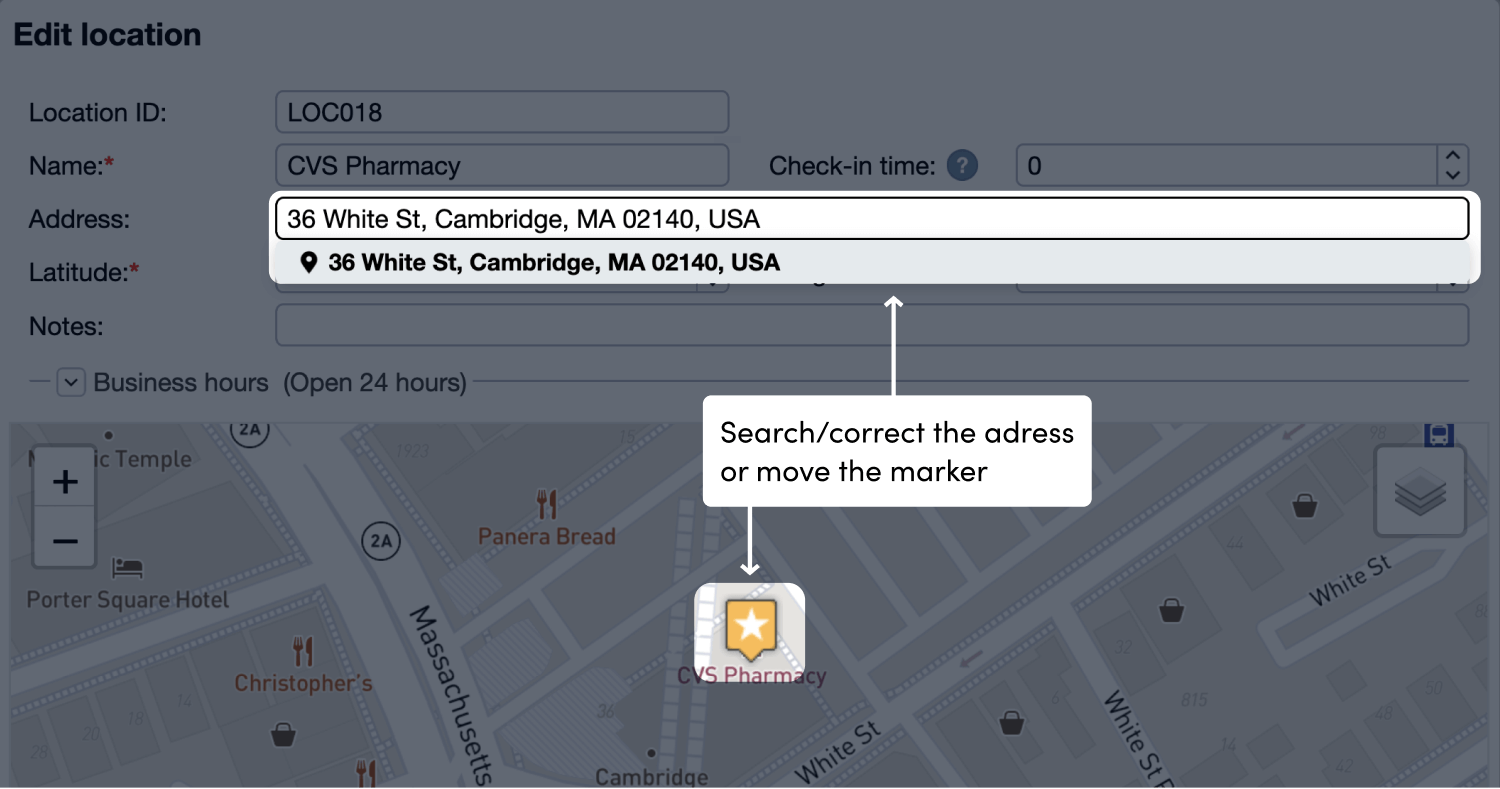
For any that are marked Not Found, the location must be opened and corrected in order to continue.
Geocoded, Partial Match and Geocoded Multiple Results Found can also be opened by double-clicking, although it’s not required in order to continue with the import.
When you are happy with the accuracy of all the orders, click Save to complete the import.
Orders can also be imported using:
- CSV or Tab delimited files – click here to learn more
- Copying and pasting
- Manual inclusion by typing each one at a time
Planning Optimal Schedules and Routes
To plan your routes and schedules click Plan Routes. Once the Planning Settings window opens you can begin to select the parameters that you want adjusted for this route.
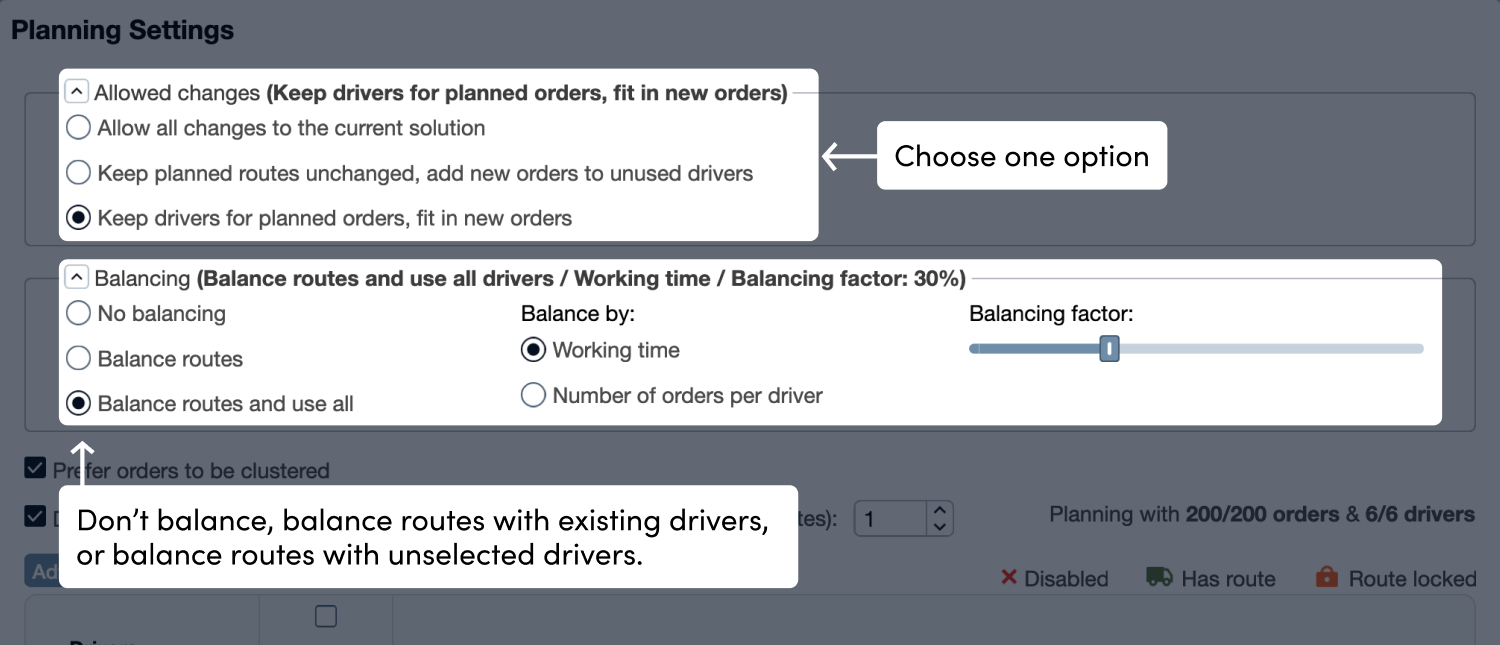
Start by selecting the view you feel more comfortable using (Advanced or Basic). Select from all three available options in the Allowed changes and Balancing options then press the Plan Day option. In seconds OptimoRoute™ plans the most efficient routes and schedules in accordance with your constraints (working hours, time windows, vehicle load capacities, etc.). The system will maximize the number of orders served while minimizing the costs associated with servicing them.

The resulting route plan displays individual drivers in different colors. The number in each marker represents the stop number for that driver. The orders in the grid below the map are grouped by driver, in stop order. You can see the scheduled arrival time for each location. Any orders not routed will appear at the top of the list.
You can manually edit an order by double clicking it, or selecting it and clicking the Edit Order button.

The Routes tab shows you:
- Distance each driver/vehicle will travel
- Duration of each route
- Vehicle load utilization
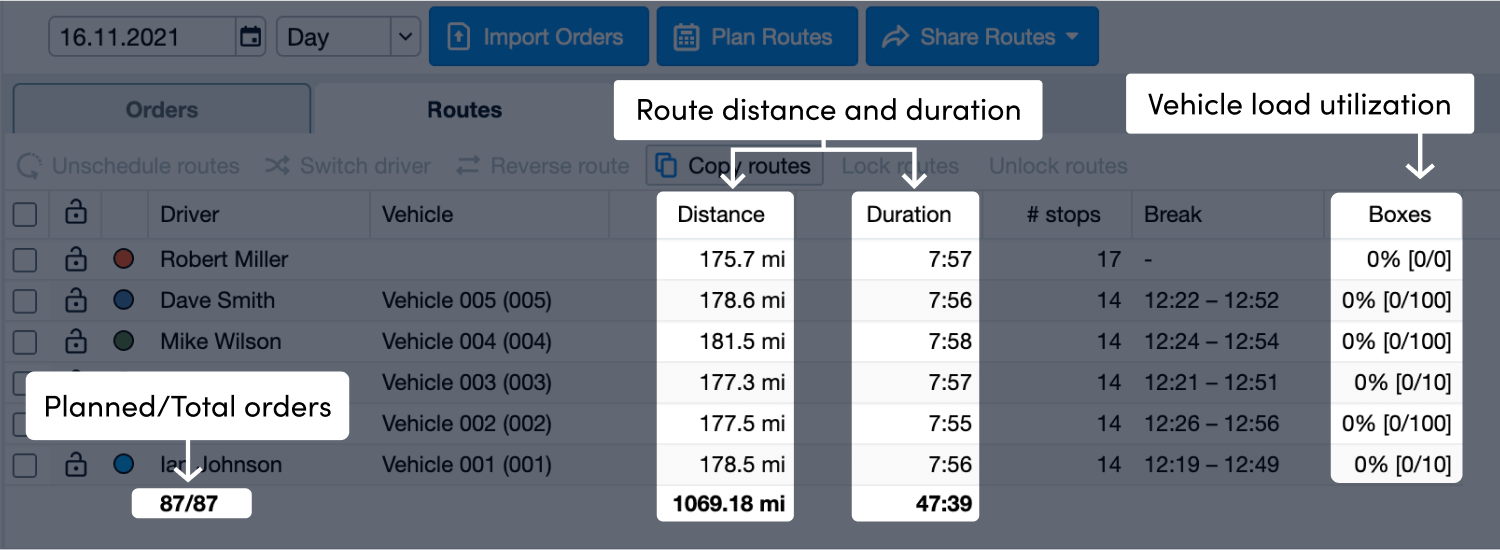
You can click on one or move drivers to isolate their route.
To learn more about Planning Settings click here.
Using the OptimoRoute™ Driver App to Share Routes With Your Team
Send optimized routes to your drivers’ phones in one click. When your drivers use the OptimoRoute™ Driver App, they receive:
- Complete Route Map
- All order information
- Schedule, including time windows
- Navigation using their preferred navigation app
- Ability to update order status, start and complete service
- Speedy updates taking into account their location and what they’ve already done
To send routes to your drivers’ phones, you first need to activate the OptimoRoute™ Driver mobile app for them. In the Mobile App manager (Administration → Mobile App) make sure their email addresses are entered, and click the Activate link for that driver.
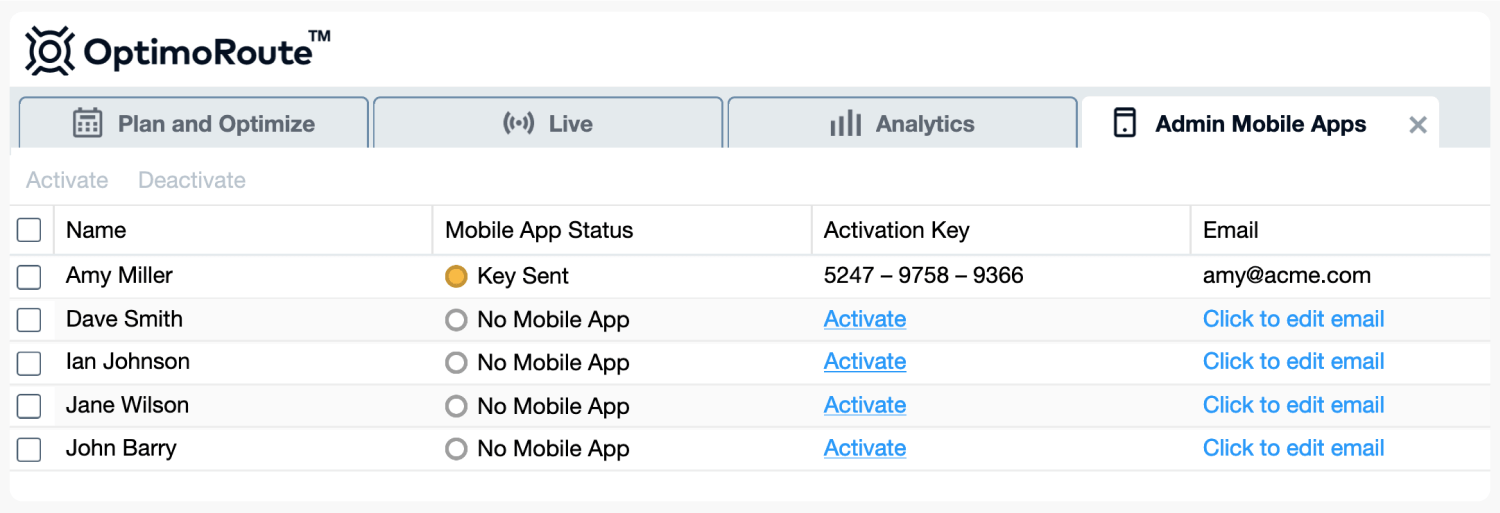
An email will be sent to the driver with instructions, a link to download the app, and their Activation Key.
When the app is activated you can send planned routes by pressing the Share Routes button and choosing Send to Driver App. Routes may take up to 30 seconds to show up on the Driver App.
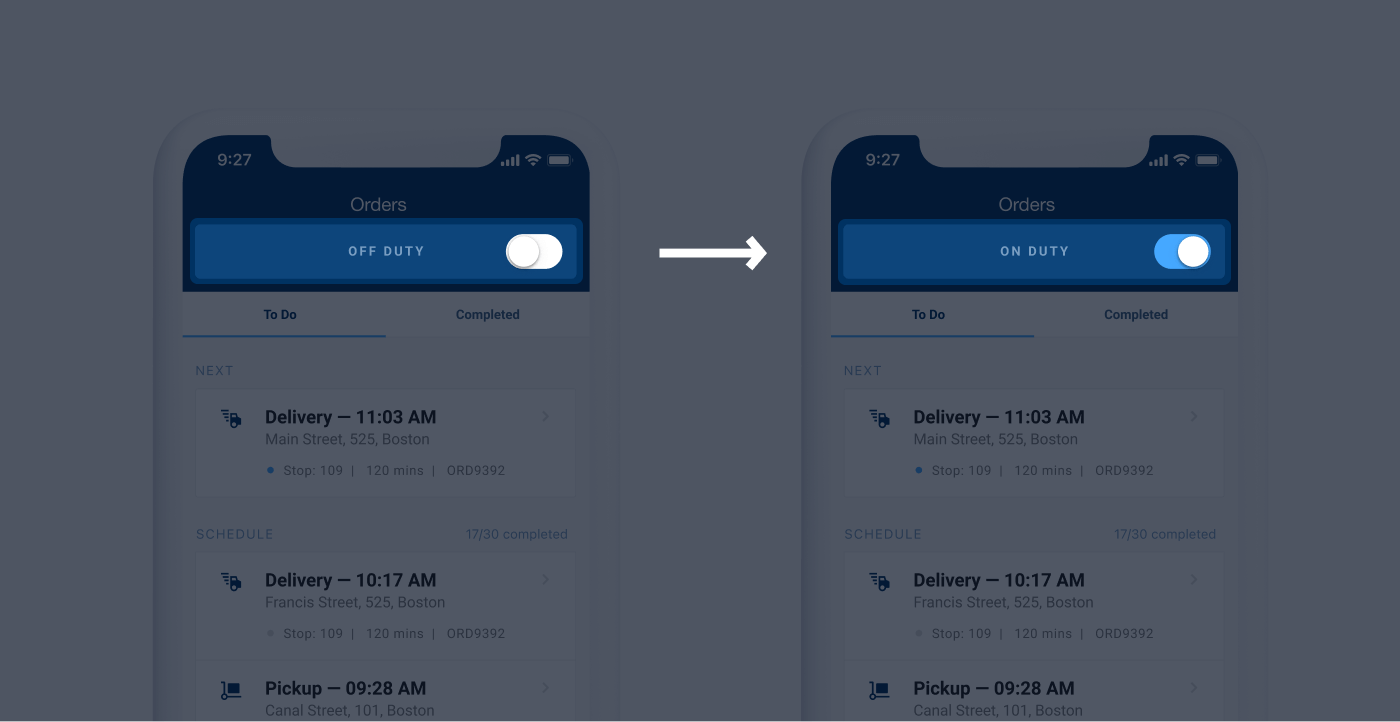
Drivers need to switch On Duty within the app at the start of their route.
If your drivers’ need assistance using the app, please refer them to Using the OptimoRoute™ Driver App Help Topic.
Alternatives to the mobile app can be found here:
- Sending routes through email
- Uploading routes to a GPS such as Garmin, TomTom, or Navigon
- Printing routes in sequential order in Excel
Track Orders With Realtime Order Tracking
With Realtime Order Tracking, customers see arrival times in real time – so they know exactly when to expect your arrival.
The feature lets you send customers:
- An email
- A text message
- Both an email and text message
- No notifications at all
You can turn Realtime Order Tracking on and off as often as you need to, depending on your preferences. You can also choose how many notifications throughout the customer’s delivery lifecycle are to be sent. Find out how to enable and use it here.
This is a Pro feature. Sign up or upgrade to an OptimoRoute Pro account here.
Confirm Completion of Orders With Proof of Delivery
OptimoRoute’s Proof of Delivery feature lets your business capture real-time proof of completion information. It collects information via the OptimoRoute Mobile Application, which is automatically fed back into the OptimoRoute Web Application.
The feature has 3 functions:
- Electronic notes
- Customer signature
- Photo capture
They can be used for different order types: Delivery, Pickup and Task, as well as for Failed Orders. Learn more about activating and configuring it here.
It’s also a Pro feature – click here to upgrade your account.
Live Tracking
When the Driver App is downloaded and used by the drivers, you can begin tracking their daily progress in real time, in the Live Tracking tab.
With live tracking you can:
- See exactly where your drivers are and what they are doing
- See what has been completed and what is left to do
- Replan and update routes in the middle of the day
- Have an accurate answer to customers about arrival times
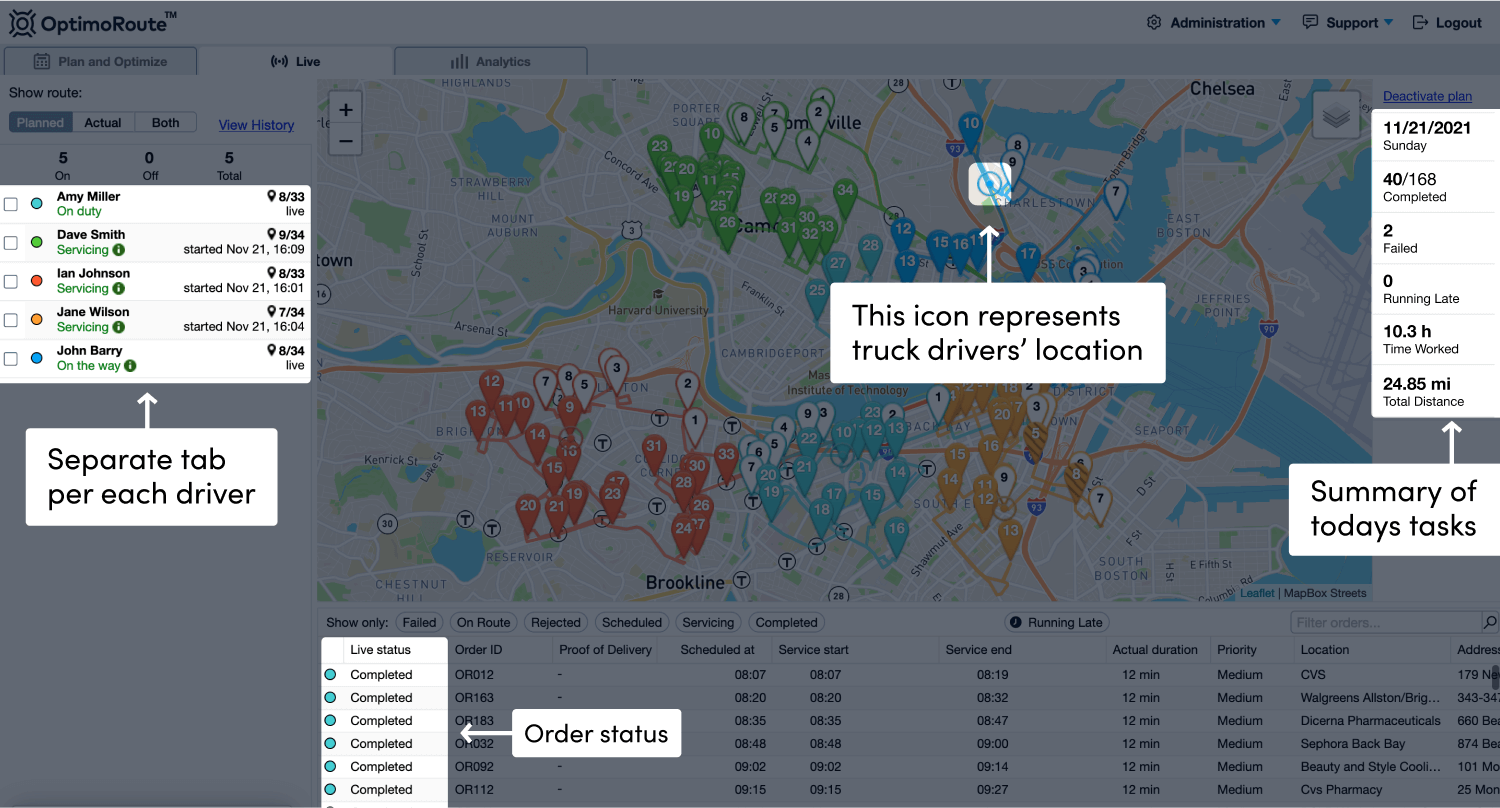
Each driver is represented on their route by a pin of the same color. You not only see their exact location but you can follow the status of their route in the “Live status” column, stating Completed, On route, Servicing or Failed.
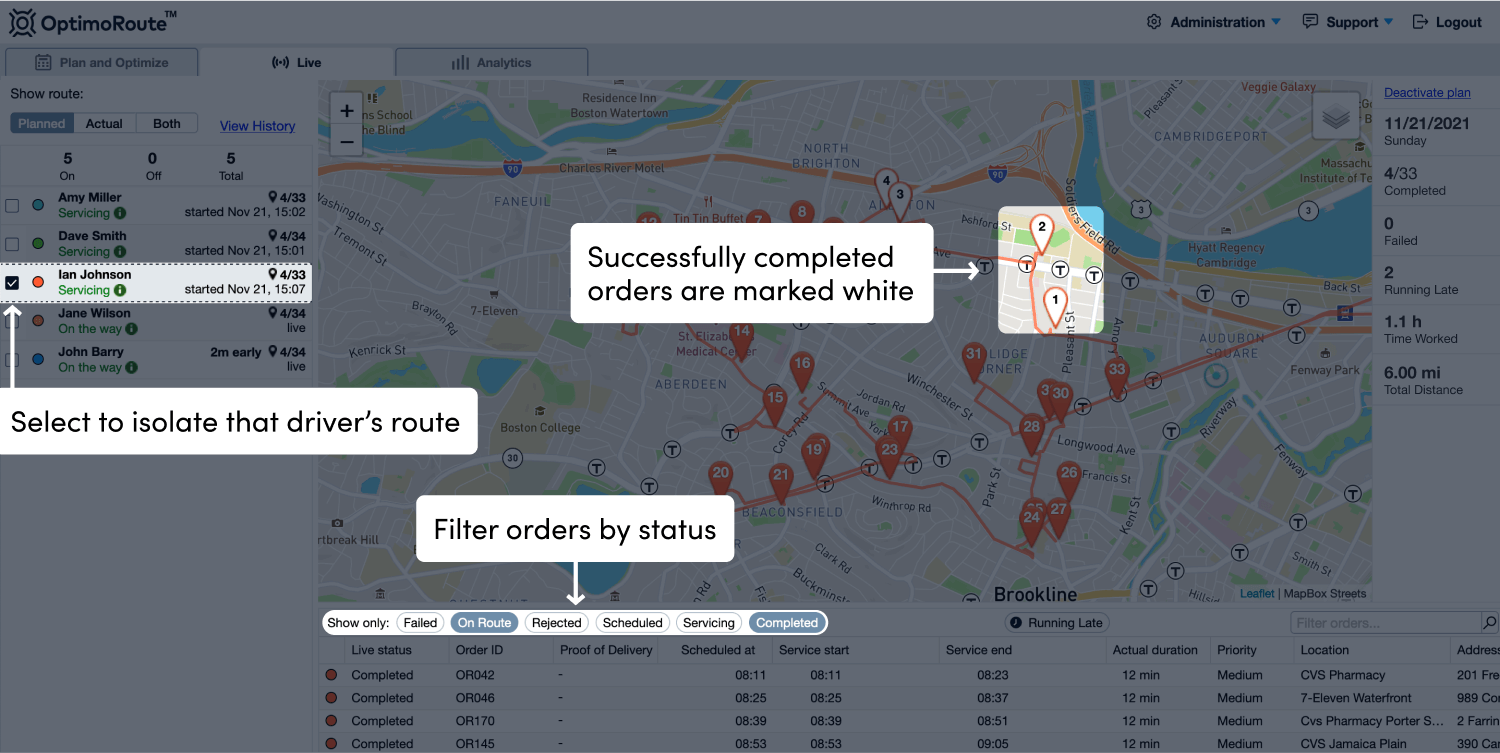
White pins highlight completed orders, and striped pins represent failed orders.
When drivers use the mobile application, dispatchers can apply their location and order status to replan and update routes in the middle of the day. Updated routes automatically include what is already loaded on their truck, take into account what’s completed, fit in new orders and schedule what’s left in the time remaining.
To replan and update your drivers’ routes, make your changes and resend the routes to the driver app. For new orders, create or import the order(s), click Plan Routes to replan, and then click Share Routes (Send to driver app) to update the routes on your drivers’ phones. New routes will keep all previously scheduled deliveries on their current trucks. For service routes, replanning can reassign service tasks to other appropriate, available techs and vehicles.
Analytics
Analytics allows you to track and compare current as well as historical statistics for your drivers.
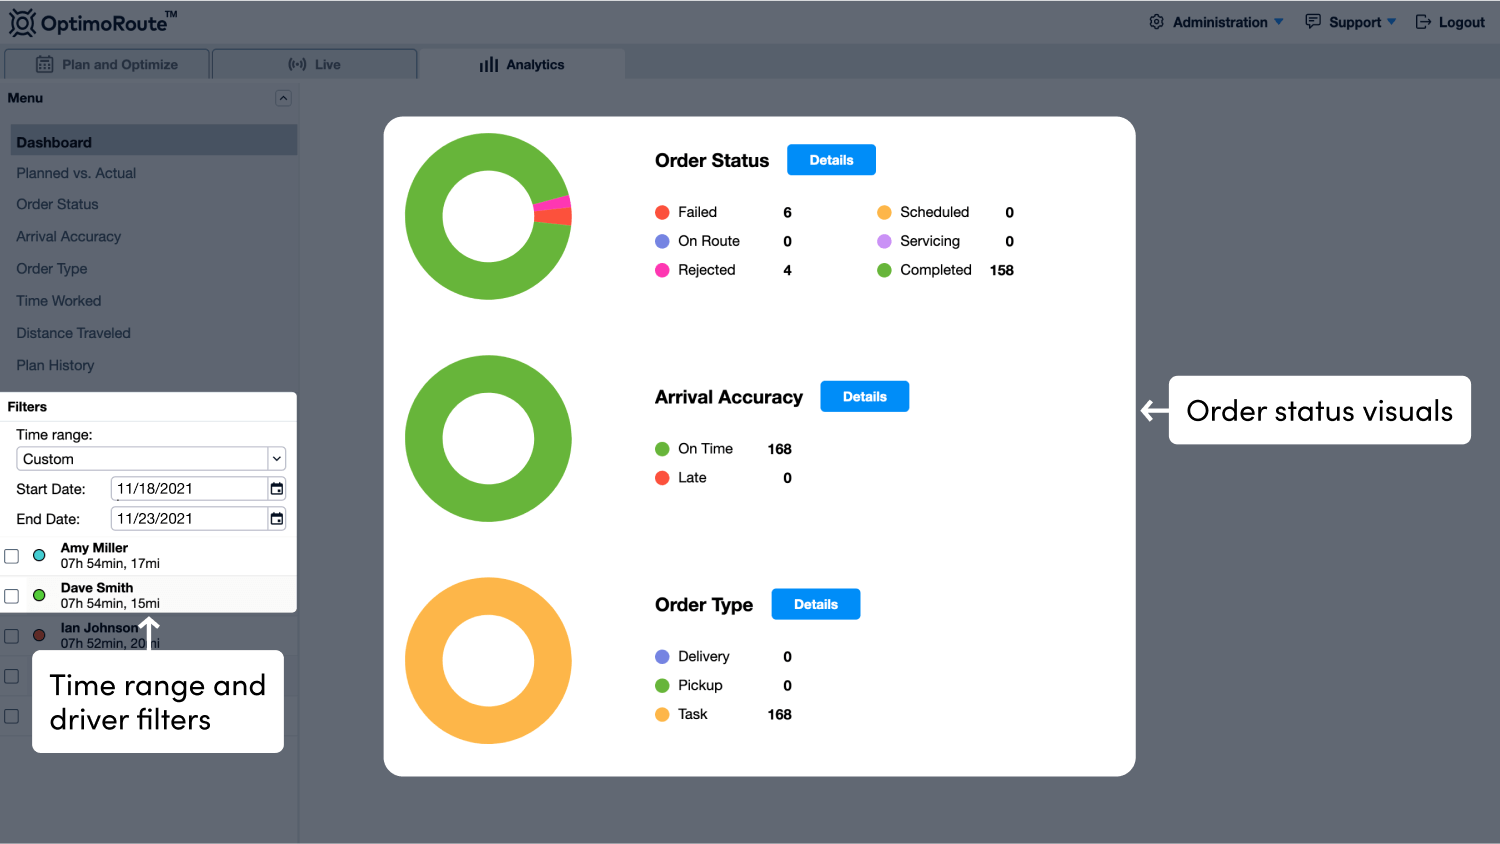
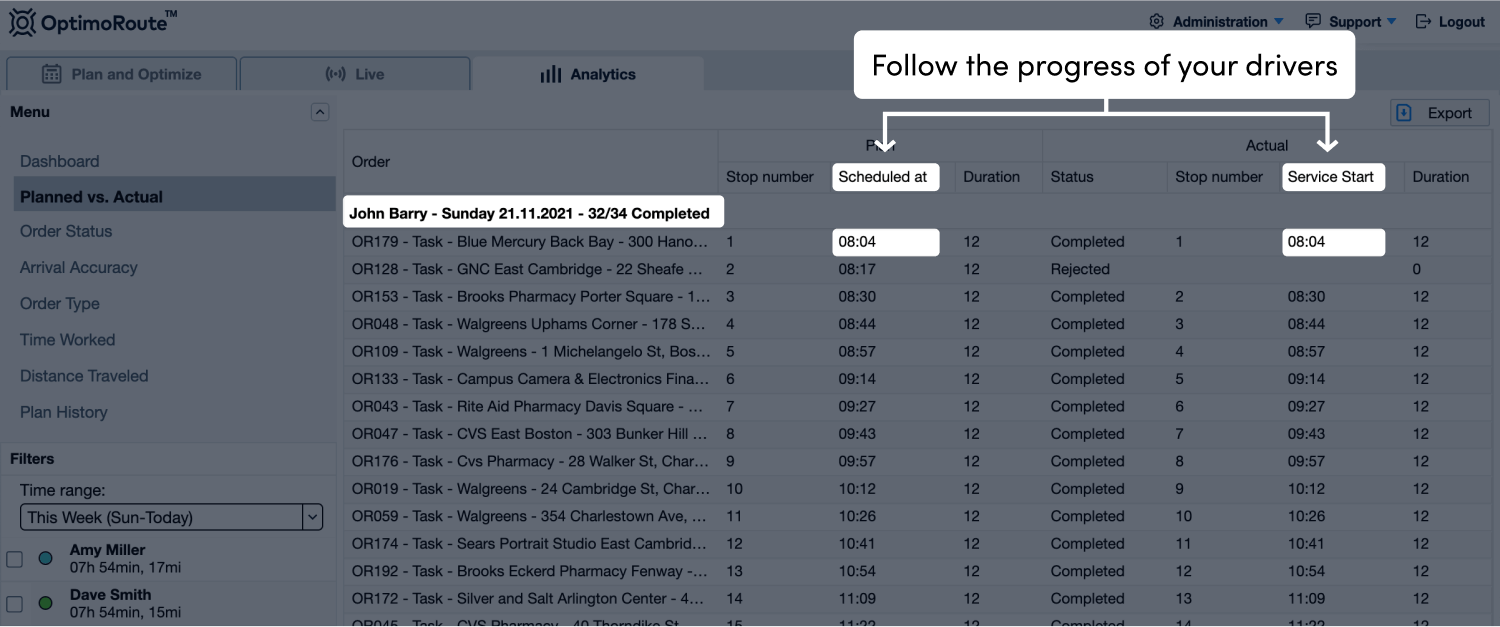
Analytics keeps up with your drivers in real time. You can use the Analytics tab to follow the progress of your drivers in one simple screen.
You can select different time ranges, be it a day, week, or month. You can also select specific drivers, or view them all at once.
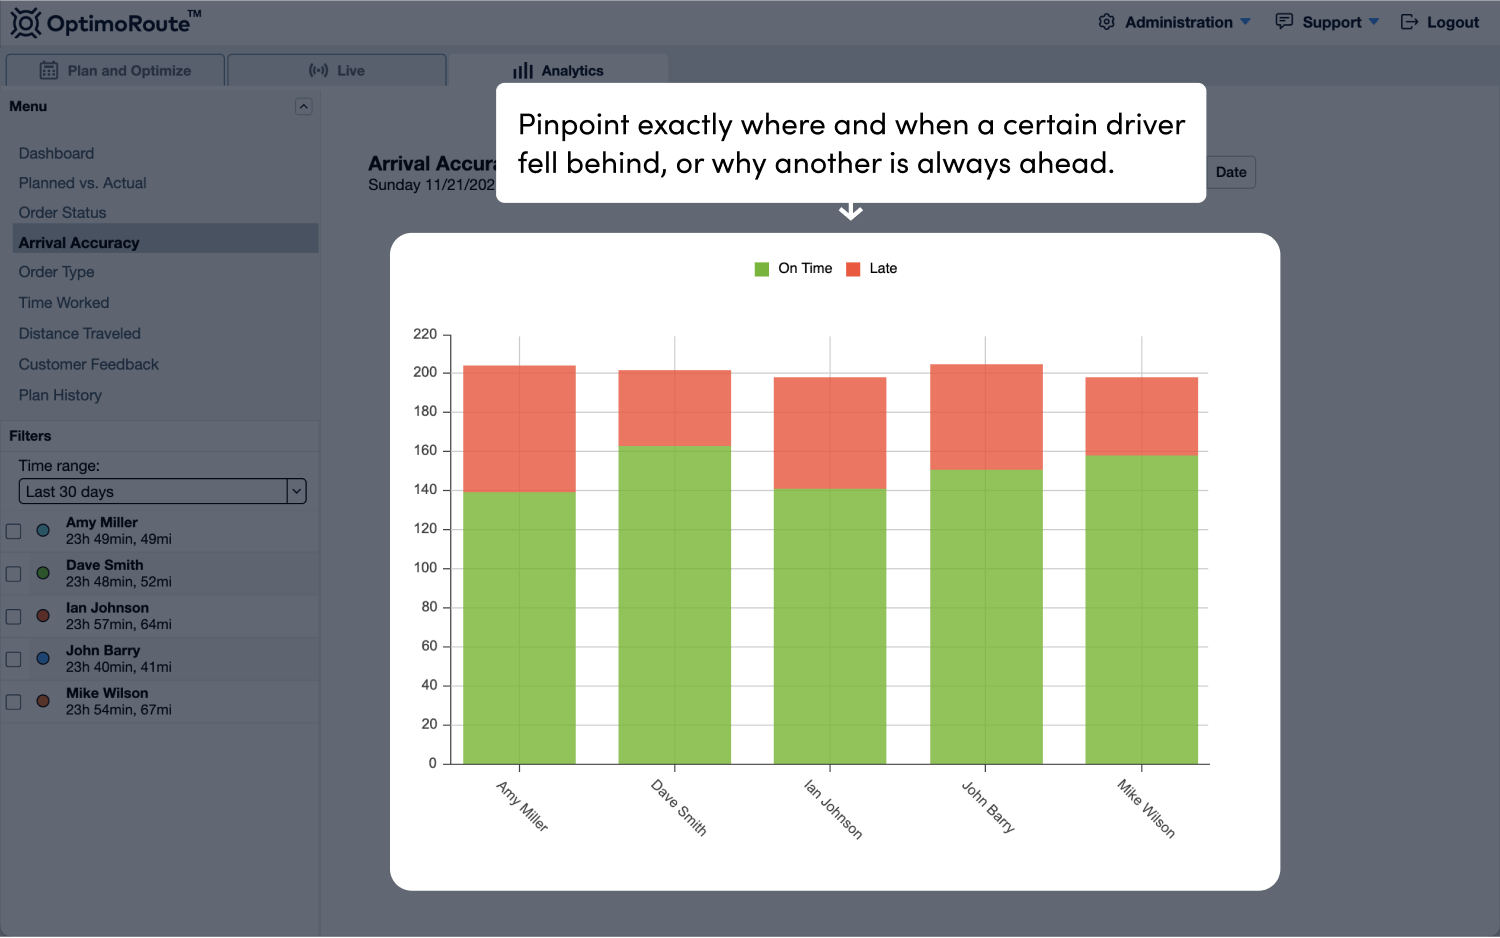
The different reports allow you to frame your drivers’ current or historical data in a number of different ways, like Planned vs. Actual routes, Arrival Accuracy, or Distance Traveled.
Planned vs Actual shows order by order how your plan compared to real time for each driver. You can pinpoint exactly where and when a certain driver fell behind, or why another is always ahead.
All charts are updated live, help you track patterns and identify top performers. The charts help illustrate areas where you can improve your operations, by adjusting order durations, if techs consistently finish early. Or changing your billing if techs generally need more time to complete orders than you originally planned.
This concludes our tutorial. For more and detailed information on any of our features, check out our other Help Topics or feel free to contact us at Support Center.
Related help topics: